Difference between revisions of "Edit On Box"
Ezra pound (talk | contribs) |
Ezra pound (talk | contribs) |
||
| Line 1: | Line 1: | ||
'''THIS PAGE IS UNDER CONSTRUCTION''' | '''THIS PAGE IS UNDER CONSTRUCTION''' | ||
| − | '''Background''' | + | ==='''Background'''=== |
| − | |||
| − | |||
| + | One item missing from the feature packed FOX HDR T2 and FOX HD T2 is ‘On Box Editing’, This is strange as the feature was included in earlier Humax PVRs, However this has now been rectified with the addition of Nicesplice to the Custom Firmware Package | ||
| + | [[File:EOB2.png|600px|right]] | ||
| − | ''' | + | ==='''Editing Via Web-If'''=== |
From the Web Interface of the Custom Firmware package, it is possible to install Nicesplice from the Package Management screen, If Nicesplice is installed then the Opt+ button in the webif media browser will show a Crop option. | From the Web Interface of the Custom Firmware package, it is possible to install Nicesplice from the Package Management screen, If Nicesplice is installed then the Opt+ button in the webif media browser will show a Crop option. | ||
| − | One problem that had to be overcome with the WebIf version of the Nicesplice is having a efficient way of selecting cut points, This has been elegantly achieved by using the Bookmark feature built into | + | One problem that had to be overcome with the WebIf version of the Nicesplice is having a efficient way of selecting cut points, This has been elegantly achieved by using the Bookmark feature built into the Humax units, So the first step in the editing process is to select a recording with the remote ‘Media’ Button and then play, While playing, press the ‘add book mark’ button on the remote at the place where you want the first ‘keep’ to start |
| − | |||
| − | |||
| − | |||
| − | |||
| − | |||
| − | |||
| − | |||
| − | |||
| − | + | The ‘logic’ of the bookmarks is as follows :- | |
| − | 3 Bookmarks = Keep content between BM1 and BM2 and join to section BM3 to end | + | *1 bookmark = Keep everything after BM1 |
| + | *2 Bookmarks = Keep content between BM1 and BM2 | ||
| + | *3 Bookmarks = Keep content between BM1 and BM2 and join to section BM3 to end | ||
| + | *4 Bookmarks = Keep content between BM1 and BM2 and join to section BM3 to BM4 | ||
| − | + | This becomes clearer if you view the Red and Green ‘Blocks’ in the example | |
| − | + | Note that cut points are always placed on key frames, usually on a scene change, So it is not possible to edit to an individual frame. To view your edit prior to executing it, select the Opt+ ‘Crop’ option in the WebIf media browser. To correct any mistakes, Place another bookmark on top of an existing bookmark to erase it. Having checked that the crop screen is correct, Select the 'Perform Crop Operation' to create a new edit file, This moves the original recording to a new folder called _original and then replaces the original recording with the cropped version | |
| − | + | ==='''Editing Via Remote Only'''=== | |
| − | |||
| − | + | ==='''Editing Via Command Line'''=== | |
| − | |||
Revision as of 00:41, 15 November 2011
THIS PAGE IS UNDER CONSTRUCTION
Background
One item missing from the feature packed FOX HDR T2 and FOX HD T2 is ‘On Box Editing’, This is strange as the feature was included in earlier Humax PVRs, However this has now been rectified with the addition of Nicesplice to the Custom Firmware Package
Editing Via Web-If
From the Web Interface of the Custom Firmware package, it is possible to install Nicesplice from the Package Management screen, If Nicesplice is installed then the Opt+ button in the webif media browser will show a Crop option.
One problem that had to be overcome with the WebIf version of the Nicesplice is having a efficient way of selecting cut points, This has been elegantly achieved by using the Bookmark feature built into the Humax units, So the first step in the editing process is to select a recording with the remote ‘Media’ Button and then play, While playing, press the ‘add book mark’ button on the remote at the place where you want the first ‘keep’ to start
The ‘logic’ of the bookmarks is as follows :-
- 1 bookmark = Keep everything after BM1
- 2 Bookmarks = Keep content between BM1 and BM2
- 3 Bookmarks = Keep content between BM1 and BM2 and join to section BM3 to end
- 4 Bookmarks = Keep content between BM1 and BM2 and join to section BM3 to BM4
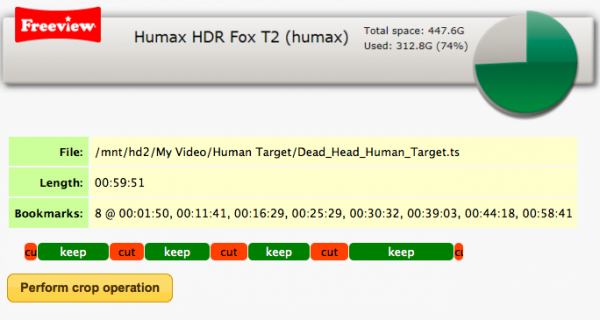
This becomes clearer if you view the Red and Green ‘Blocks’ in the example
Note that cut points are always placed on key frames, usually on a scene change, So it is not possible to edit to an individual frame. To view your edit prior to executing it, select the Opt+ ‘Crop’ option in the WebIf media browser. To correct any mistakes, Place another bookmark on top of an existing bookmark to erase it. Having checked that the crop screen is correct, Select the 'Perform Crop Operation' to create a new edit file, This moves the original recording to a new folder called _original and then replaces the original recording with the cropped version
