Difference between revisions of "Fixes / Work Arounds for Known Bugs"
Ezra pound (talk | contribs) |
Ezra pound (talk | contribs) |
||
| Line 36: | Line 36: | ||
Steps to remove the orange filter :- | Steps to remove the orange filter :- | ||
| − | #Ensure the unit un-plugged from the mains electricity supply | + | #Ensure the unit is un-plugged from the mains electricity supply |
#Use a hair dryer to remove warranty seal without breaking it | #Use a hair dryer to remove warranty seal without breaking it | ||
#Remove top 3 screws from rear cover | #Remove top 3 screws from rear cover | ||
| − | #Slide | + | #Slide top cover towards read and then lift |
#Release Front panel from chassis by removing 2 screws | #Release Front panel from chassis by removing 2 screws | ||
#Remove chassis Earth Screw | #Remove chassis Earth Screw | ||
| − | #Remove 4 way and 12 way chassis connectors (Squeeze before pulling) | + | #Remove 4 way and 12 way chassis connectors (Squeeze 4 way before pulling) |
#Lift 3 Front panel clips and remove front panel | #Lift 3 Front panel clips and remove front panel | ||
#Remove the USB PCB from the Display PCB (2 Screws) | #Remove the USB PCB from the Display PCB (2 Screws) | ||
Revision as of 16:55, 26 May 2013
The Fixes / Work Arounds detailed here are primarily for the HUMAX HDR FOX T2 with 1.02.20 software but will in a lot of cases also work on the HUMAX HD FOX T2
Contents
Deleting a Recorded Program Fails
Symptom
After watching a recorded program it is not possible to delete the program, There is a bug in the Humax software that allows the user to navigate away from a watched recorded program while the program is still in ‘Play’ mode,
Work Around
The work around for this is to re-select the program for playing and press stop before navigating away from the program, It will then be possible to delete the ‘Stopped’ program
Display Too Dim
Background
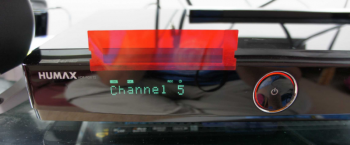
If you find the orange display on your Humax too dim it can be changed to a brighter Blue / Green Display
Fix
| WARNING:-
This procedure could invalidate your warranty, The Authors of this WiKi will not take any responsibility for any action you take having read this article |
Steps to remove the orange filter :-
- Ensure the unit is un-plugged from the mains electricity supply
- Use a hair dryer to remove warranty seal without breaking it
- Remove top 3 screws from rear cover
- Slide top cover towards read and then lift
- Release Front panel from chassis by removing 2 screws
- Remove chassis Earth Screw
- Remove 4 way and 12 way chassis connectors (Squeeze 4 way before pulling)
- Lift 3 Front panel clips and remove front panel
- Remove the USB PCB from the Display PCB (2 Screws)
- Remove 4 Display PCB screws
- Unclip the Display PCB from plastic housing (7 clips)
- Peel orange filter from Display
- Clean Display methylated spirit or similar
- Re-assemble in reverse order
Download Not Working
Problem
When selecting 'Download' in the Web-If the file is played on your P.C. but not stored in a file, this is due to the *.TS file being associated with a media player, so the file is streamed instead of stored, If the association is removed then the file will be downloaded rather than played
Fix
In some cases it may be possible to instruct the media played not to automatically 'play' a certain type of file and this should be tried first, however it is quite common to be able to change an association (to another media player) but possible to remove the association all together. It is possible to remove the association using Start >> Run >> regedit. BUT you must be careful as regedit is very powerful and can stop Windows working completely. Navigate to ComDlg3 >> OpenSaveMRU >> TS (path shown at the bottom) and delete the entry where 'value not set' is shown
Live Playback Not Working
Symptom
When watching live TV, 9 Remote buttons stop working, They are, Play, Pause, Stop, Re-Wind Fast Forward, Jump Back, Jump Forward Navigate Left and Navigate Right this effectively removes the live buffer from the Humax.
This bug is caused by the user inadvertently entering the current channel again from the remote, So while watching channel 1 with a fully working remote press ‘1’, There will be a ---1 display on the TV for a couple of seconds and then all appears to be as it was, However try using one of the 9 buttons in the list above ! ! !
Work Around
The only work around for this is to select another TV channel which will of course delete the current live buffer, So not a very satisfactory work around
Multiple Humax Remotes
Problem
If you have more than one HUMAX product in the same room (say Freeview and Freesat) you may find that their remotes control the wrong receiver, It is possible to synchronize a remote / receiver using an alternative set of remote codes
Solution
- Switch on your TV set and the Humax product that you wish to change the remote code
- Make sure that the other Humax product that you do not wish to control is in Standby or powered OFF at the mains
- Point the remote control towards the target receiver.
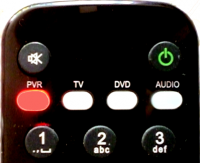
- Press and hold the 0 and OK buttons simultaneously for 5 seconds until the PVR button on the remote stays red.
- This message will appear on the TV screen:
"You can change the remote control mode. Press a Numeric Key (<1> ~ <6>) to select the mode Current mode: Mode 1."
- Press a NUMERIC button (from 1 to 6) to select a different mode.
- A message confirming the change of Mode will appear on screen e.g.
Remote control mode has been changed to mode X.
Notes:
- As default the mode on all products will be set to "1"
- If the receiver does not operate, retry from '3' above after 10 seconds
- Known to work with :- HDR-FOX-T2, HD-FOX-T2, FOXSAT-HDR, FOXSAT-HD and HDCI-5000
Network Streaming 4Gig Limit
Background
It has been confirmed by several users that both the HDR-Fox T2 and HD-Fox T2 will not accept a DLNA streamed file of more than 4G Bytes, The Humax boxes appears to be capable of ‘outputting’ file streams larger than 4G Bytes (in Server mode), But will cut short any received file stream (in client mode) that is bigger than 4G Bytes
FIX / Workaround
Humax have released firmware version (1.02.28) which resolves this problem. Another possible Workaround for this problem is to split the video file into smaller segments, This is possible using a Custom Firmware Utility HERE
Remote Not Working
Symptom
There are lots of reason your remote may not be working, This article covers one very common ‘User Error’, Caused by the user inadvertently pressing one of the TV, DVD or Audio Buttons and de-selecting the PVR function
FIX
Humax have added on-screen indication of which 'mode' the Remote Control is in to firmware version 1.02.28, this only works on remotes that are labelled 'MDB 1.3' inside the battery compartment (Not ADB 1.0). While pressing any 'non white' button on the remote note which white button lights up red, If you are expecting to control the PVR you should expect the PVR LED to light, If it doesn't press PVR and this mode will be retained until another ‘white’ button is pressed
CHECK
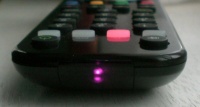
You can check if your remote is working by viewing the IR emitter on a Digital camera display screen, as they can ‘See’ the invisible Infra-Red light
If The buttons have become unresponsive, You may need to clean the rear of the buttons, Instructions for opening the case are HERE
Series Recording Fails
Background
It has been quite widely reported that under certain circumstances series recordings have failed when the Humax has been left un-attended for extended periods, This is due to the unit not periodically updating the EPG, The problem has been noticed more often for Padding Users due to ‘Rules 4 & 5’
Here are a set of rules that apply to EPG update :-
- The Humax does not update the EPG when it wakes at 4:30am to look for OTAs
- The Humax does not update the EPG in Standby
- The Humax does not update the EPG while it is recording
- The Humax does not update the EPG prior to recording in Padding Mode
- The Humax will update the EPG prior to recording in Accurate Recording mode
- The Humax will update the EPG during a >15Min Auto On / Off or scheduled reminder
- The Humax will update the EPG on a standby to Wake up transition
This problem would effect 'Padding' users after not turning on the Humax for 7 days and would only effect Accurate Recording if nothing at all was scheduled except a fortnightly series recording.
Work Around
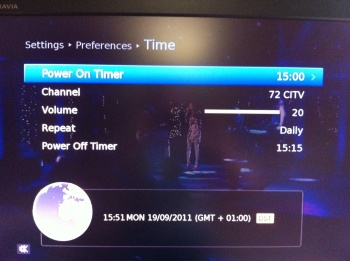
Apply Item 6 above, This can be achieved by setting a daily Auto On / Off timer, e.g. Menu >> Settings >> Preferences >> Time and entering a Power On timer at a quite period say 5:00am and a Power Off Timer 15 Minutes later
Humax is permanently Deleting
Problem
The Humax displays '* Deleting' message permanently, preventing many normal functions from operating including recording etc.
Solution
Run the Fix Disk Utility built into Custom Firmware 2.12 and answer 'Yes' to the question "Are you having problems with a delete loop [Y/N]?". Fix-Disk has a 'Deleting Fix', which performs FIX 1 below :-
Fix 1
If the Custom Firmware is installed then delete the following corrupted file using Telnet :-
/etc/init.d/S90settop shut
rm /mnt/hd1/filebglastop.dat
/etc/init.d/S90settop resume
reboot
Fix 2
If the problem still remains after running Fix-Disk, Download and install version 1.01.09 via USB flash (Details Here) check to see that the 'Deleting' message is no longer being displayed and then download and install your desired (Latest) version.


