Difference between revisions of "Remote Scheduling Portal"
| (69 intermediate revisions by 2 users not shown) | |||
| Line 1: | Line 1: | ||
| − | + | <tabs> | |
| − | + | <tab name="Overview"> | |
| − | + | ==== What is the Remote Scheduling Portal? ==== | |
| + | |||
| + | Remote Scheduling is a web site which enables you to manage your list of scheduled recordings while you're out and about, from anywhere with a web browser and Internet connection, without having to expose your Humax device to the Internet or leave it powered on. | ||
| + | |||
| + | As long as your Humax has Internet access and wakes up occasionally to check for updates or make a recording, it will work. | ||
| + | |||
| + | It allows you to perform the following: | ||
| + | * Schedule recording of a single/series/split/manual TV or radio event. | ||
| + | * Automatically schedule recording of a single/series event based on keywords/channel/time etc. | ||
| + | * Remove recording schedule. | ||
| + | * See disk contents. | ||
| + | * Delete a recorded program, useful when the box is running low on free space. | ||
| + | * Get warnings about failed recordings. | ||
| + | * See disk statistics (total/used/free space). | ||
| + | * See warnings about recording conflicts, eg when more than two concurrent recordings have been scheduled within the same time window. | ||
| + | |||
| + | ==== HD/HDR-Fox T2 ==== | ||
| + | |||
| + | All commands are queued on the server and the box polls the server for commands every 8-12 minutes. | ||
| − | + | This means that it's a secure solution because you don't need to open up your firewall at home in order to use this (many similar systems are "push" instead of "pull"). | |
| − | + | At each startup the program waits a random time, up to 2 minutes, spreading out server communication in order to avoid that all boxes contact the server at the exact same time. | |
| − | + | Most commands require a powercycle to take effect, except for "delete" and "reboot". | |
| − | |||
| − | + | The "reboot" command is not carried out if the box is currently recording. Instead, the processing is stopped and not resumed until the box is no longer busy. | |
| − | + | ==== Foxsat-HDR ==== | |
| − | + | All commands are queued on the server and the box polls the server for commands every 10 minutes when the box isn't already busy, eg recording (the rs package depends on the crond package). | |
| − | + | This means that it's a secure solution because you don't need to open up your firewall at home in order to use this (many similar systems are "push" instead of "pull"). | |
| − | |||
| − | |||
| − | |||
| − | + | At each startup the program waits a random time, up to 2 minutes, spreading out server communication in order to avoid that all boxes contact the server at the exact same time. | |
| − | + | Most commands require a powercycle to take effect, except for "delete" and "reboot". | |
| − | + | During the Housekeeper boot at 03:00 the box is supposed to do as little as possible so queued commands are not received and executed during this boot. | |
| − | + | The "reboot" command is not carried out if the box is currently recording or converting (convertfiles). | |
| + | Instead, the processing is stopped and not resumed until the box is no longer busy. | ||
| − | + | If the system is currently running a convertfiles process when the disk contents is pushed to the server the .ts file size is taken from the .tmp file (the original) and the .tmp file is not sent to the server as the current .ts/.tmp files are transient. | |
| − | + | ==== Comparision of Features Available to Supported PVRs ==== | |
| − | + | ||
| − | + | Humax models supported are: | |
| − | + | # HD-Fox T2 | |
| − | + | # HDR-Fox T2 | |
| − | + | # Foxsat-HDR | |
| − | + | ||
| − | + | The following table compares the various features available to each model: | |
| − | { | + | |
| − | {{#tag:tab| | + | {| class="wikitable" style="margin: auto;" |
| − | {{#tab:{{ | + | ! Feature !! HD-Fox T2 !! HDR-Fox T2 !! Foxsat-HDR !! Notes |
| − | + | |- | |
| − | </ | + | | colspan="5"|'''Home:''' |
| + | |- | ||
| + | | Pending Schedule - Delete || Enabled || Enabled || Enabled | ||
| + | |- | ||
| + | | Pending Schedule - Enable/Disable AR || Enabled || Enabled || Disabled | ||
| + | |- | ||
| + | | Pending Schedule - Refresh Events || Enabled || Enabled || Disabled | ||
| + | |- | ||
| + | | Pending Schedule - Change Folder || Enabled || Enabled || Enabled | ||
| + | |- | ||
| + | | Active Schedule - Delete || Enabled || Enabled || Enabled | ||
| + | |- | ||
| + | | Active Schedule - Enable/Disable AR || Enabled || Enabled || Disabled | ||
| + | |- | ||
| + | | Active Schedule - Refresh Events || Enabled || Enabled || Disabled | ||
| + | |- | ||
| + | | Active Schedule - Change Folder || Enabled || Enabled || Enabled | ||
| + | |- | ||
| + | | colspan="5"|'''EPG:''' | ||
| + | |- | ||
| + | | EPG - Now/Next || Enabled || Enabled || Enabled | ||
| + | |- | ||
| + | | EPG - Grid Style || Enabled || Enabled || Enabled | ||
| + | |- | ||
| + | | EPG Searches || Enabled || Enabled || Enabled | ||
| + | |- | ||
| + | | Record Series || Enabled || Enabled || Enabled | ||
| + | |- | ||
| + | | Record Programme || Enabled || Enabled || Enabled | ||
| + | |- | ||
| + | | Set Reminder || Enabled || Enabled || Disabled | ||
| + | |- | ||
| + | | Recording Conflict Detection || Enabled || Enabled || Enabled | ||
| + | |- | ||
| + | | colspan="5"|'''Automatic Scheduling Feature:''' | ||
| + | |- | ||
| + | | Email Matching Events || Enabled || Enabled || Enabled | ||
| + | |- | ||
| + | | Email Matching Series || Enabled || Enabled || Enabled | ||
| + | |- | ||
| + | | Schedule Matching Events || Enabled || Enabled || Enabled | ||
| + | |- | ||
| + | | Schedule Matching Series || Enabled || Enabled || Enabled | ||
| + | |- | ||
| + | | Schedule Reminders for Matching Events || Enabled || Enabled || Disabled | ||
| + | |- | ||
| + | | colspan="5"|'''Visual page provides an alternative view of:''' | ||
| + | |- | ||
| + | | Scheduled Events || Enabled || Enabled || Enabled | ||
| + | |- | ||
| + | | Pending Events || Enabled || Enabled || Enabled | ||
| + | |- | ||
| + | | Conflicts || Enabled || Enabled || Enabled | ||
| + | |- | ||
| + | | colspan="5"|'''Recordings:''' | ||
| + | |- | ||
| + | | Display Recording Details || Enabled || Enabled || Enabled | ||
| + | |- | ||
| + | | Delete Recordings || Enabled || Enabled || Enabled | ||
| + | |- | ||
| + | | colspan="5"|'''Email Warnings:''' | ||
| + | |- | ||
| + | | Hard Disk Problem || Enabled || Enabled || Disabled | ||
| + | |- | ||
| + | | Upcoming Conflict(s) || Enabled || Enabled || Enabled | ||
| + | |- | ||
| + | | Failed Recording(s) || Enabled || Enabled || Enabled | ||
| + | |- | ||
| + | | colspan="5"|'''WebIf Packages:''' | ||
| + | |- | ||
| + | | recmon (Recording monitor) || Enabled || Enabled || Built in || Simplified recmon that'll report recorded programs<br />after a few hours (instead of immediately when they finish<br />recording as the T2 recmon package does) | ||
| + | |- | ||
| + | | Smartmontools (S.M.A.R.T. Status) || Enabled || Enabled || Disabled | ||
| + | |} | ||
| + | |||
| + | ==== Foxsat-HDR Port Differences ==== | ||
| + | Most of the features have been ported with the following variations owing to differences in the two platforms (hardware or TV platform, ie Freeview vs Freesat): | ||
| + | * The custom channel names are used instead of default channel names. | ||
| + | * The server's conflict management has been extended to warn about conflicts for concurrent recordings on incompatible channels when only one satellite feed is available and tuner 1 is looped to tuner 2. | ||
| + | * Often the Housekeeper job removes scheduled split events so a method of converting these to one single manual event has been implemented. This currently only works on split events with two parts. Enabling this feature is controlled by the user. | ||
| + | * The Freesat guide is flaky and often single events don't have an ECRID, eg Click and The Film Review on BBC NEWS, which means that it can be difficult to schedule them for recording. Instead, scheduled single events missing an ECRID are converted to manual single events. | ||
| + | * Refresh of series events, skipping a series event, scheduling of reminders and changing scheduled events to use Accurate Recording are not supported by the Foxsat-HDR, hence these features are not provided on the RS server. | ||
| + | * Foxsat-HDR doesn't have a concept of pending schedules. These are instead simulated by taking a snapshot of the schedules at boot time and comparing actual schedules against this. This method isn't foolproof (eg a recording scheduled directly on the box using the remote control handset is regarded as pending and if the aforementioned recording is removed through WebIf or Remote Scheduling this will not take effect until after a reboot and in this case we create a dummy reboot pending record), however it hasn't been possible to find another way of handling pending schedules. | ||
| + | * Foxsat-HDR doesn't support the inotify interface in the Linux kernel so recmon hasn't been implemented. On the HDR-Fox T2 recmon is used to log a message on the box and the server as soon as a recording has finished, notifying that the given programme was recorded. Instead, a lazy recorded log mechanism has been implemented: Every few hours the recordings completed since the last reporting are logged on the box and the server, for instance: | ||
| + | : <code>16/02/2017 07:11:56 - Recorded: BBC2 HD 15 Feb 2017 19:55:00-21:04:48 Trust Me, I'm a Doctor (69 minutes, 2.30 GiB)</code> | ||
| + | : This means that recordings removed before the next reporting window will not be logged. | ||
| + | * rs_process is not a Jim/TCL program as the original but has instead been rewritten entirely in C++ owing to Jim file name clashes, major platform differences and also differences in the Jim language support. | ||
| + | * rs_process and rs binaries are installed in /opt/bin. | ||
| + | * Multi-mode Recording isn't supported. | ||
| + | * The Foxsat-HDR CFW doesn't have a S.M.A.R.T. interface, so no S.M.A.R.T. status is sent to/displayed by the RS server. | ||
| + | * The Foxsat-HDR CPU is quite slow compared to the HDR-Fox T2, so the rs_process program (the main controller) detects whether the system is too busy to carry out any commands. Specifically, the program terminates almost instantly when it starts up and detects that the number of currently playing/recording programs is larger than the user-configurable '''Max. Running Playbacks+Recordings''' value (default set to 0), regarding the system as being too busy. This means that the server is only queried for queued commands if the system is non-busy. No efforts are made towards detecting playbacks over DLNA and/or SMB, only directly on the box. | ||
| + | * For the same reason, only non-hidden channels are pushed to the server, in order to keep CPU/disk usage to a minimum. You control which channels are hidden in the WebIf Channel Editor. | ||
| + | * Non-Freesat channels aren't supported with Remote Scheduling as most of the channels don't have EPG entries. | ||
| + | * Foxsat-HDR doesn't show any actual padding assignment to the schedule so the pre/post padding shown by the RS server is a guestimate. | ||
| + | * The BBC region is determined based on the name of channel 101 using the following mappings, no other channels are used for determining the region: | ||
| + | |||
| + | {| class="wikitable" style="margin: auto;" | ||
| + | |- | ||
| + | ! Channel !! BBC Region !! Net | ||
| + | |- | ||
| + | | BBC One CI || Channel Islands || 501 | ||
| + | |- | ||
| + | | BBC One East E || East (East) || 502 | ||
| + | |- | ||
| + | | BBC One East W || East (West) || 503 | ||
| + | |- | ||
| + | | BBC One E Mid || East Midlands || 504 | ||
| + | |- | ||
| + | | BBC One Lon || London || 505 | ||
| + | |- | ||
| + | | BBC One NE&C || North East & Cumbria || 506 | ||
| + | |- | ||
| + | | BBC One N West || North West || 507 | ||
| + | |- | ||
| + | | BBC One NI HD || Northern Ireland || 508 | ||
| + | |- | ||
| + | | BBC One ScotHD || Scotland || 509 | ||
| + | |- | ||
| + | | BBC One South || South || 510 | ||
| + | |- | ||
| + | | BBC One S East || South (East) || 511 | ||
| + | |- | ||
| + | | BBC One Oxford || South (Oxford) || 512 | ||
| + | |- | ||
| + | | BBC One S West || South West || 513 | ||
| + | |- | ||
| + | | BBC One Wal HD || Wales || 514 | ||
| + | |- | ||
| + | | BBC One West || West || 515 | ||
| + | |- | ||
| + | | BBC One W Mid || West Midlands || 516 | ||
| + | |- | ||
| + | | BBC One Yorks || Yorkshire || 517 | ||
| + | |- | ||
| + | | Other || Unknown || 518 | ||
| + | |} | ||
| + | |||
| + | {{#tag:tab|==== Known Issues ==== | ||
| + | ===== HD/HDR-Fox T2 ===== | ||
| + | None. | ||
| + | ===== Foxsat-HDR ===== | ||
| + | * If you rename files to include special characters directly on the box with the remote control handset these characters are ASCII 8-bit, which means that the files will not be visible via WebIf, Samba and DLNA (although MediaTomb can be configured for this). Furthermore, they will disrupt the upload of disk content metadata to the RS server, which means that file names containing UTF-8 characters will not be handled correctly, eg you won't be able to delete them through the RS server. | ||
| + | * Gives incorrect boot reason if booted from WebIf version 2.88. Perhaps a future version of WebIf will fix this. | ||
| + | |collapsed=true|name="Known Issues"}} | ||
| + | |||
| + | ==== New Terms ==== | ||
| + | ;rs package | ||
| + | : The Remote Scheduling program that runs on your Humax (which needs to be running the Customised Firmware including the Web Interface package). | ||
| + | ;https://rs.hpkg.tv/ | ||
| + | : The Remote Scheduling website that captures your schedule requirements and synchronises them to your Humax at home. | ||
| + | |||
| + | </tab><tab name="Getting Started"> | ||
| + | {{#tag:tab|== Getting Started on the HD/HDR-Fox T2 == | ||
| + | If you are not already running the Customised Firmware then please have a look at the Wiki and Black Hole's threads at the top of the https://hummy.tv/forum/forums/hd-hdr-fox-t2-customised-firmware.28/ Forum which covers how to get started and ready to move on. | ||
| + | * Make sure you're running at least version 1.11 of the Customised Firmware (see Firmware Downloads). | ||
| + | * Install the latest WebIf and rs packages. | ||
| + | * See Wireless Users Notes below if you are connected via Wi-Fi. | ||
| + | * Go to the Settings page in your device's local web interface and register with the remote scheduling service. | ||
| + | * Wait for your initial password to arrive via email. | ||
| + | * Access https://rs.hpkg.tv/ and accept the Terms & Conditions to get started. | ||
| + | When you first log in there is some important information regarding what the site will and won't do and general Terms & Conditions to agree to before you can proceed. | ||
| + | This gets you to the Home page which, to begin with, will show you the existing schedule details from your Hummy. | ||
| + | |||
| + | ===== Wireless Users Notes ===== | ||
| + | If your HD/HDR-Fox T2 is usually connected to your network via wireless, then it will not connect to the wireless network when it wakes up to make a recording. | ||
| + | You can install the wireless-helper package to change this behaviour and increase the opportunities for your Humax to check for new recordings. | ||
| + | The wireless-helper package currently only supports wireless networks using WPA or WPA2. It is planned to extend support to at least WEP in a future release. | ||
| + | |||
| + | ===== Scheduling Sequence of Events ===== | ||
| + | If your Humax is in standby when a new recording is '''Queued''' using Remote Scheduling, your Humax will not be aware of the new request until it is taken out of stand-by, | ||
| + | when your Humax awakes the recording's status will move to '''Pending''' and a further stand-by >> awake cycle is required in order to make the new recording request move to '''Active'''. | ||
| + | It is possible to remove the need for a further stand-by >> awake cycle by requesting a 'Scheduled Reboot' in the RS Home page so that the Humax will perform two reboots in one. | ||
| + | |||
| + | ===== Frequency of Wake-up ===== | ||
| + | To have the best chance of being able to successfully schedule a recording, you should set your HD/HDR-Fox T2 to wake up for 30 minutes at least once a day which is most easily done through the on-screen menus at Settings->Preferences->Time: | ||
| + | |||
| + | [[File:RS_Fox-T2-PowerOnTimer.png]] | ||
| + | |||
| + | In conjunction with the overnight update check, this ensures that your device checks for new recordings at least twice a day. Any recordings that you have set will also enable the Humax to check for updates. | ||
| + | It is also possible to schedule additional wake-up/sleep periods via the RS portal using the Additional Commands option which is below the list of scheduled recordings. | ||
| + | You may wish to do this when going away from home for an extended period for example. | ||
| + | |collapsed=true|name="Getting Started on the HD/HDR-Fox T2"}} | ||
| + | |||
| + | {{#tag:tab|== Getting Started on the Foxsat-HDR == | ||
| + | If you are not already running the Customised Firmware then please have a look at https://www.avforums.com/threads/media-file-server-bundle-for-the-foxsat-hdr-release-4-part-6.2024876/ Forum which covers how to get started and ready to move on. | ||
| + | * Make sure you're running at least version 4.1.3 of the Customised Firmware and at least version 2.88 of the WebIf. | ||
| + | * Install the rs package. | ||
| + | * Go to the Settings page in your device's local web interface and register with the remote scheduling service. | ||
| + | * Wait for your initial password to arrive via email. | ||
| + | * Access https://rs.hpkg.tv/ and accept the Terms & Conditions to get started. | ||
| + | When you first log in there is some important information regarding what the site will and won't do and general Terms & Conditions to agree to before you can proceed. | ||
| + | This gets you to the Home page which, to begin with, will show you the existing schedule details from your Hummy. | ||
| + | The initial upload of your Hummy's channels, EPG and recording schedule can take several minutes, up to 10-15 minutes. | ||
| + | You can limit the amount of data your Hummy sends by hiding the channels you don't need/use in the WebIf Channel Editor. | ||
| + | |||
| + | ===== Scheduling Sequence of Events ===== | ||
| + | If your Humax is in standby when a new recording is '''Queued''' using Remote Scheduling, your Humax will not be aware of the new request until it is taken out of stand-by, | ||
| + | when your Humax awakes the recording's status will move to '''Pending''' and a further stand-by >> awake cycle is required in order to make the new recording request move to '''Active'''. | ||
| + | It is possible to remove the need for a further stand-by >> awake cycle by requesting a 'Scheduled Reboot' in the RS Home page so that the Humax will perform two reboots in one. | ||
| + | |||
| + | ===== Frequency of Wake-up ===== | ||
| + | To have the best chance of being able to successfully schedule a recording, you should set your Humax to wake up for 30 minutes at least once a day which is most easily done through the on-screen menus at Menu->Settings->Time: | ||
| + | |||
| + | [[File:RS_Foxsat-HDR-PowerOnTimer.png]] | ||
| + | |||
| + | It is also possible to schedule additional wake-up/sleep periods through the on-screen menus at Schedule->Manual Watch reservation: | ||
| + | |||
| + | [[File:RS_Foxsat-HDR-WatchReservation.png]] | ||
| + | |||
| + | You may wish to do this when going away from home for an extended period for example. | ||
| + | {{Note|Once again, please keep in mind how RS queries queued server commands in relation to the setting of '''Max. Running Playbacks+Recordings''' (default set to 0). Specifically, if you expect RS to query and process queued server commands when the box is recording this doesn't happen unless '''Max. Running Playbacks+Recordings''' is set to a value larger than or equal to the number of recordings (plus playbacks) currently running on the box.}} | ||
| + | |||
| + | |collapsed=true|name="Getting Started on the Foxsat-HDR"}} | ||
| + | |||
| + | The Remote Scheduling server, which can be accessed from https://rs.hpkg.tv/ has a menu bar that remains on all pages: | ||
| + | |||
| + | [[File:RS_Menu.png]] | ||
| + | |||
| + | The various buttons are explained via the tabs at the top of this page. | ||
| + | </tab><tab name="Home"> | ||
| + | This page describes the [[File:RS_Home-Button.png]] button on the [https://rs.hpkg.tv/ Remote Scheduling Web Site] | ||
| + | ---- | ||
| + | The following appear on the 'Home' page: | ||
| + | |||
| + | == Queued commands == | ||
| + | These are the things you have done on the web site. Set recordings, deleted schedules. | ||
| + | At this stage they are only held on the website until the next 10 minute 'sweep' or your Hummy wakes up and check the site. | ||
| + | |||
| + | [[File:RS_Home-Queued.png]] | ||
| + | |||
| + | === Deleting Queued Items === | ||
| + | You'll notice the Queued items list has a dustbin icon at the end of each line and this will remove the item from the queue and therefore won't sync with your Hummy. | ||
| + | |||
| + | == Pending Events == | ||
| + | |||
| + | The Humax knows about these items, but it needs a reboot in order to save them into the schedule list on the Humax so that they actually work as expected. | ||
| + | |||
| + | [[File:RS_Home-Pending.png]] | ||
| + | |||
| + | === Deleting Pending Events === | ||
| + | Click on the item in the Pending list and choose the <code>Cancel Event</code> option. This will create a cancellation line in the Queued commands list for each event to be deleted and will wait for the next sync between the site and your Humax. | ||
| + | |||
| + | Just like setting a recording the cancellation item will then sit in the Pending queue on your Humax until a restart takes place hence you can also send along a reboot action with the cancellation just like you can with a new recording. BUT like setting a recording, if your Humax is in standby it needs to wake up in order to sync in the first place. Less of a worry when deleting items as it's no problem to record something you now don't want any more (unless it conflicts with other recordings you want). | ||
| + | |||
| + | === More Context Menu === | ||
| + | |||
| + | ===== HD/HDR Fox T2 ===== | ||
| + | Each event has the following items on the more context menu: | ||
| + | |||
| + | [[File:RS_Home-Active-More-T2.png]] | ||
| + | |||
| + | {| class="wikitable" | ||
| + | |- | ||
| + | | '''Delete''' || Delete the selected event. | ||
| + | |- | ||
| + | | '''Disable AR''' || Disable Accurate Recording (AR) for the selected event. See "Multi-mode Recording" below. | ||
| + | |- | ||
| + | | '''Refresh Events''' || The Fox T2 schedule database contains a binary field aulEventToRecordInfo. | ||
| + | Refresh just blanks that field out on the next reboot which makes the Humax software re-populate it based on events in the current EPG. | ||
| + | It's really a troubleshooting/diagnostic thing but can also be used to re-add any episodes which have been set up for skip. | ||
| + | |- | ||
| + | | '''Change Folder''' || Change the folder name to be used for series recodings. | ||
| + | |} | ||
| + | |||
| + | ===== Foxsat-HDR ===== | ||
| + | Each event has the following items on the more context menu: | ||
| + | |||
| + | [[File:RS_Home-Active-More-Foxsat.png]] | ||
| + | {| class="wikitable" | ||
| + | | '''Delete''' || Delete the selected event. | ||
| + | |- | ||
| + | | '''Change Folder''' || Change the folder name to be used for series recodings. | ||
| + | |} | ||
| + | |||
| + | == Active Events == | ||
| + | These are all the items the Humax knows about AND will carry them out in full. | ||
| + | |||
| + | [[File:RS_Home-Active.png]] | ||
| + | |||
| + | === Deleting Active Events === | ||
| + | Click on the item(s) in the Active list and then choose the [Delete Selected] button, or another option is to click [Delete] on the event's context menu. | ||
| + | |||
| + | To delete all finished events select the [Select Finished] button and then the [Delete Selected] button. | ||
| + | |||
| + | This will create a cancellation line in the Queued commands list for each event to be deleted and will wait for the next sync between the site and your Humax. | ||
| + | |||
| + | Just like setting a recording the cancellation item will then sit in the Pending queue on the Humax until a restart takes place hence you can also send along a reboot action with the cancellation just like you can with a new recording. BUT like setting a recording, if your Humax is in standby it needs to wake up in order to sync in the first place. Less of a worry when deleting items as it's no problem to record something you now don't want any more (unless it conflicts with other recordings you want). | ||
| + | |||
| + | === More Context Menu === | ||
| + | |||
| + | ===== HD/HDR-Fox-T2 ===== | ||
| + | See "Pending Events", "More Context Menu", "HD/HDR-Fox T2" which is the same. | ||
| + | |||
| + | ===== Foxsat-HDR ===== | ||
| + | See "Pending Events", "More Context Menu", "Foxsat-HDR" which is the same. | ||
| + | |||
| + | == Additional Commands == | ||
| + | |||
| + | ===== HD/HDR-Fox T2 ===== | ||
| + | At the end of the Active list there are the following buttons: | ||
| + | |||
| + | [[File:RS_Home-Active-ScheduleReboot.png]] - Schedule a Reboot. | ||
| + | |||
| + | [[File:RS_Home-Active-ManualEvent.png]] - Create a Manual Event (a recording or reminder). | ||
| + | |||
| + | [[File:RS_Home-Active-RawDatabase.png]] - View the Raw Database. | ||
| + | |||
| + | ===== Foxsat-HDR ===== | ||
| + | At the end of the Active list there are the following buttons: | ||
| + | |||
| + | [[File:RS_Home-Active-ScheduleReboot.png]] - Schedule a Reboot. | ||
| + | |||
| + | [[File:RS_Home-Active-ManualEvent.png]] - Create a Manual Event (recording only). | ||
| + | |||
| + | [[File:RS_Home-Active-RawDatabase.png]] - View the Raw Database. | ||
| + | |||
| + | == Recent Activity == | ||
| + | This is a simple view of an event log - it's not meant to be an exhaustive audit trail but it does confirm that things are happening and when they happened. | ||
| + | |||
| + | [[File:RS_Home-RecentActivity.png]] | ||
| + | |||
| + | You can see a more detailed list of every event tracked by clicking the <code>More</code> button and then even more detail via the <code>Show diagnostic entries</code> button. | ||
| + | You can also delete the contents of the log file via the [Delete log entries] button. | ||
| + | |||
| + | == Top 10/500 list == | ||
| + | Clicking on a programme in the Top 10/500 list will display all broadcast times for that programme with the ability to set up a recording from there. | ||
| + | |||
| + | [[File:RS_Home-Top10500List.png]] | ||
| + | |||
| + | </tab><tab name="EPG"> | ||
| + | This page describes the [[File:RS_EPG-Button.png]] button on the [https://rs.hpkg.tv/ Remote Scheduling Web Site] | ||
| + | -- | ||
| + | {{Note|Remote Scheduling doesn't automatically detect changes in the channel lineup or the WebIf Favourite lists. | ||
| + | With any change to these you will have to run the following from a command line on the box in order to push the changes to the server. | ||
| + | This applies to the HD/HDR-Fox T2 and Foxsat-HDR: | ||
| + | |||
| + | rs push channels | ||
| + | }} | ||
| + | |||
| + | The following appear on the 'EPG' page: | ||
| + | |||
| + | == EPG - Now/Next == | ||
| + | |||
| + | Clicking a specific programme displays a pop-up with details from the EPG (Electronic Programme Guide). | ||
| + | Clicking the Channel name hyperlink will display all EPG entries for that channel. | ||
| + | |||
| + | [[File:RS_EPG-Guide-NowNext.png]] | ||
| + | |||
| + | You can switch to the grid display by clicking on the <code>Grid EPG</code> button. | ||
| + | |||
| + | == EPG - Grid Style == | ||
| + | |||
| + | Where programs are of a duration too short to display in the grid, the title hyperlink is truncated, | ||
| + | which can be clicked to see the full programme EPG information in the same way as the Now/Next EPG function. | ||
| + | Clicking the Channel name hyperlink will display all EPG entries for that channel. | ||
| + | |||
| + | [[File:RS_EPG-Guide-Grid.png]] | ||
| + | |||
| + | You can switch to the Now/Next display by clicking on the <code>Now/Next</code> button. | ||
| + | |||
| + | The cell width is adjustable to avoid left to right scrolling. | ||
| + | |||
| + | Note that the narrower settings for cell width will result in more programme titles not being displayed in full on the EPG 7-day page. | ||
| + | But if you hover over the programme a pop-up window will display the full title and start/end times. | ||
| + | Set a value that works best for you. See the <code>Settings</code> button below. | ||
| + | |||
| + | The Navigation bar enables: | ||
| + | * Selecting the time range displayed. | ||
| + | * Selecting 'Now', the current day & time. | ||
| + | * Selecting the required day. | ||
| + | |||
| + | [[File:RS_EPG-Navication.png|950px]] | ||
| − | == | + | == EPG Searches == |
| + | The EPG page provides 2 methods of searching for programs which covers the full 7 days. | ||
| − | + | ==== 1. EPG Search ==== | |
| + | Will search the EPG data for specific text in the programme title | ||
| + | (and optionally the programme description). | ||
| + | By default, results are filtered by the standard Channel List mechanism | ||
| + | although this can be over-ridden in the case of a search. | ||
| − | + | [[File:RS_EPG-Search.png|950px]] | |
| − | === | + | You can use the following operators and rules to refine/enhance the search results: |
| − | + | {| class=wikitable | |
| + | | + || stands for AND | ||
| + | |- | ||
| + | | - || stands for NOT | ||
| + | |- | ||
| + | | no operator || implies OR | ||
| + | |- | ||
| + | | "two words" || in quotes must appear together | ||
| + | |- | ||
| + | | +doctor +(amy tardis) || containing 'doctor' and one of 'amy' or 'tardis' | ||
| + | |} | ||
| + | |||
| + | ==== 2. Content Type Searches ==== | ||
| − | + | Will search the EPG data on the content type (genre). | |
| − | + | The results are filtered by the standard Channel List mechanism. | |
| − | |||
| − | |||
| − | |||
| − | |||
| − | |||
| − | |||
| − | |||
| − | |||
| − | |||
| − | |||
| − | |||
| − | |||
| − | |||
| − | + | [[File:RS_EPG-Search-Content.png|950px]] | |
| − | ==== | + | == Scheduling a Recording == |
| − | |||
| − | |||
| − | |||
| − | |||
| − | ==== | + | ==== HD/HDR-Fox T2 ==== |
| − | |||
| − | |||
| − | |||
| − | |||
| − | |||
| − | |||
| − | |||
| − | |||
| − | |||
| − | |||
| − | + | Click on the programme name that you want to schedule and you will get a dialogue box with more detailed programme info, plus buttons at the bottom to record the series, just the program, set a reminder or cancel. | |
| − | |||
| − | |||
| − | |||
| − | |||
| − | |||
| − | |||
| − | |||
| − | + | [[File:RS_EPG-ProgDetails-T2.png]] | |
| − | |||
| − | |||
| − | |||
| − | + | No recording option buttons will be displayed for programmes already scheduled for recording. | |
| − | + | Confirmation of the successful or otherwise setting of the recording will be shown in a banner at the top of the page: | |
| − | |||
| − | + | [[File:RS_EPG-Confirmation.png]] | |
| − | + | Once this is done the Home page will now show a section at the top called Queued commands - at this stage these are only stored on the website awaiting a sync with your HD/HDR-Fox T2. | |
| + | Every 10-12 minutes or so (or on next reboot if the HD/HDR-Fox T2 is on standby) your HD/HDR-Fox T2 will contact the site to see if there is anything to sync and if there are items in Queued commands they will be picked up and copied over to your HD/HDR-Fox T2, and then they will appear in a Pending list. | ||
| + | There is a 'last seen' time/date stamp at the top of the Home Page so you know if the site is seeing your Humax. | ||
| − | + | Please note that due to the way the core HD/HDR-Fox T2 software works a restart of the HD/HDR-Fox T2 is then required in order for Pending items to actually take place. | |
| + | This is why items in the Queued commands list also have a button for <code>Schedule Reboot</code> - if you click this a reboot command is also sent to the HD/HDR-Fox T2 along with your recordings, and the HD/HDR-Fox T2 will restart itself shortly after synchronising the Queued commands thus ensuring your recordings/changes take place. | ||
| − | + | [[File:RS_EPG-QueuedCommands.png]] | |
| − | + | All HD/HDR-Fox T2 have an auto update task at 4:30 am every morning so at worst case they wake up every morning and any Pending Items already on the Humax will become active. Otherwise if you have the HD/HDR-Fox T2 on standby when you are not there you may want to schedule a power cycle or two so that the HD/HDR-Fox T2 wakes up and can pick up any Queued and/or Pending items and incorporate them fully into the schedule (there is a function for this under Additional Commands). | |
| − | |||
| − | |||
| − | |||
| − | |||
| − | |||
| − | |||
| − | |||
| − | |||
| − | |||
| − | |||
| − | |||
| − | |||
| − | |||
| − | |||
| − | + | You can force a sync from the command line with: | |
| + | /mod/sbin/rs_process now | ||
| + | To push the schedule from the command line use: | ||
| + | rs push | ||
| + | Don't forget that if you have the HD/HDR-Fox T2 on standby when you make the schedule then it'll need one wake up to pick up the scheduled item(s), then another in order to successfully incorporate them into the schedule on the HD/HDR-Fox T2. You can send the second reboot along with the schedule but the first has to already be defined on the HD/HDR-Fox T2 (either the built in daily 4:30am auto update or wake up/sleep cycles you can program yourself). | ||
| − | + | ==== Foxsat-HDR ==== | |
| − | |||
| − | |||
| − | |||
| − | + | Click on the programme name that you want to schedule and you will get a dialogue box with more detailed programme info, plus buttons at the bottom to record the series, just the programme or cancel. | |
| − | + | [[File:RS_EPG-ProgDetails-Foxsat.png]] | |
| − | |||
| − | |||
| − | |||
| − | + | No recording option buttons will be displayed for programmes already scheduled for recording. | |
| − | |||
| − | |||
| − | + | Confirmation of the successful or otherwise setting of the recording will be shown in a banner at the top of the page: | |
| − | |||
| − | + | [[File:RS_EPG-Confirmation.png]] | |
| − | |||
| − | + | Once this is done the Home page will now show a section at the top called Queued commands - at this stage these are only stored on the website awaiting a sync with your Foxsat-HDR. | |
| − | + | Every 10-12 minutes or so (or on next reboot if the Foxsat-HDR is on standby) your Foxsat-HDR will contact the site to see if there is anything to sync and if there are items in Queued commands they will be picked up and copied over to your Foxsat-HDR, and then they will appear in a Pending list. | |
| − | + | There is a 'last seen' time/date stamp at the top of the Home Page so you know if the site is seeing your Humax. | |
| − | |||
| − | |||
| − | |||
| − | |||
| − | + | Please note that due to the way the core Foxsat-HDR software works a restart of the Humax is then required in order for Pending items to actually take place. | |
| − | This | + | This is why items in the Queued commands list also have a button for <code>Schedule Reboot</code> - if you click this a reboot command is also sent to the Humax along with your recordings, and the Foxsat-HDR will restart itself shortly after synchronising the Queued commands thus ensuring your recordings/changes take place. |
| − | |||
| − | |||
| − | + | [[File:RS_EPG-QueuedCommands.png]] | |
| − | |||
| − | + | You need to have set up at least one daily wake up/sleep cycle and any Pending Items already on the Foxsat-HDR will become active. Otherwise if you have the Foxsat-HDR on standby when you are not there you may want to schedule a power cycle or two so that the Foxsat-HDR wakes up and can pick up any Queued and/or Pending items and incorporate them fully into the schedule. | |
| − | |||
| − | |||
| − | |||
| − | |||
| − | |||
| − | |||
| − | |||
| − | |||
| − | |||
| − | + | You can force a sync from the command line with: | |
| − | + | rs_process now | |
| − | + | To push the schedule from the command line use: | |
| − | + | rs push | |
| − | + | Don't forget that if you have the Foxsat-HDR on standby when you make the schedule then it'll need one wake up to pick up the scheduled item(s), then another in order to successfully incorporate them into the schedule on the Foxsat-HDR. You can send the second reboot along with the schedule but the first has to already be defined on the Foxsat-HDR, see 'Getting Started'-> 'Frequency of Wake-up'-> 'Foxsat-HDR' above. | |
| − | |||
| − | |||
| − | |||
| − | ==== | + | ====== Reminder ====== |
| − | + | * Queued commands are not received and executed when the number of currently playing/recording programs is larger than the user-configurable '''Max. Running Playbacks+Recordings''' value (default set to 0), regarding the system as being too busy. | |
| − | + | * During the Housekeeper boot at 03:00 the box is supposed to do as little as possible so Queued commands are not received and executed during this boot. | |
| − | * | ||
| − | * | ||
| − | |||
| − | |||
| − | + | == Recording Conflict Detection == | |
| − | |||
| − | |||
| − | |||
| − | + | The scheduling mechanism will check for recording conflicts each time a new recording is scheduled. | |
| − | |||
| − | |||
| − | |||
| − | |||
| − | |||
| − | |||
| − | |||
| − | |||
| − | |||
| − | |||
| − | |||
| − | |||
| − | |||
| − | |||
| − | + | If a schedule conflict is detected, all conflicting recordings will be displayed in the pop-up window: | |
| − | |||
| − | |||
| − | |||
| − | |||
| − | |||
| − | |||
| − | |||
| − | |||
| − | |||
| − | |||
| − | |||
| − | + | [[File:RS_EPG-ConflictDetection.png]] | |
| − | |||
| − | |||
| − | |||
| − | |||
| − | |||
| − | |||
| − | |||
| − | |||
| − | |||
| − | |||
| − | |||
| − | |||
| − | + | {{Note|For this to work correctly on the '''Foxsat-HDR''' you must first set the number of satellite feeds available to your Foxsat-HDR in the 'RemoteScheduling Plug-in Settings' section on the 'Settings' page of the Web Interface.}} | |
| − | |||
| − | |||
| − | |||
| − | |||
| − | |||
| − | |||
| − | |||
| − | |||
| − | |||
| + | </tab><tab name="Auto"> | ||
| + | This page describes the [[File:RS_Auto-Button.png]] button on the [https://rs.hpkg.tv/ Remote Scheduling Web Site] | ||
---- | ---- | ||
| + | The Remote Scheduling Portal includes an automatic scheduling feature. | ||
| + | This allows you to set up rules which are matched against the EPG data as it comes in eight days ahead. | ||
| + | When a match is found, it's possible to either have it send you an email message, or to attempt to automatically schedule the recording on your behalf. | ||
| + | |||
| + | There are 2 types of rules: | ||
| + | |||
| + | == Standard Rules == | ||
| + | |||
| + | [[File:RS_Auto-StandardRules.png|950px]] | ||
| + | |||
| + | ==== Add New Rule ==== | ||
| + | [[File:RS_Auto-Standard-Add.png]] | ||
| + | ;Type | ||
| + | : The type of rule, either Email which causes emails to be sent when matches are found or Schedule which attempts to schedule any events found and also emails notification of the schedule. | ||
| + | ;Subtype | ||
| + | : Whether to treat matches as single events or, if possible, series. | ||
| + | ;Date | ||
| + | : If specified, only match events which occur on this date. | ||
| + | ;Day | ||
| + | : If specified, only match events which occur on this day or set of days (e.g. weekdays). Note that if you use this to only schedule events occurring on particular days then you should most likely be using the Schedule Events option rather than Schedule Series. If you schedule the series then the day restriction will only apply to the original matching event - you will get the rest of the series regardless of the day. | ||
| + | ;Start Time | ||
| + | : If specified, only match events which start between the times provided. | ||
| + | ;Channel | ||
| + | : If specified, only match events shown on this channel. | ||
| + | ;Content Type | ||
| + | : If specified, only match events with this content type (as set by the content provider). | ||
| + | ;Name | ||
| + | : Part of the EPG name to match. This supports wild cards, '*' for 0 or more characters, '?' for exactly one character. It is matched against the EPG as a substring. | ||
| + | ;Synopsis | ||
| + | : Part of the EPG synopsis. This supports the same wild cards as name. | ||
| + | |||
| + | ==== More Context Menu ==== | ||
| + | Each rule has the following items on the more context menu: | ||
| + | [[File:RS_Auto-Standard-More.png]] | ||
| + | {| class=wikitable | ||
| + | | '''Edit''' || Allows changes to an existing Auto search. | ||
| + | |- | ||
| + | | '''Delete''' || Removes a single standard rule. | ||
| + | |- | ||
| + | | '''Disable/Enable Rule''' || Allows the rule to be disabled/enabled. | ||
| + | |- | ||
| + | | '''Convert to Advanced''' || Converts standard to advanced rule. | ||
| + | |- | ||
| + | | '''Show Matching Events''' || Displays a current search results for the current 'Auto' search. | ||
| + | |- | ||
| + | | '''Reset Matched Events''' || Enables all previously found CRID's for the current search to be emailed / scheduled again. | ||
| + | |} | ||
| + | |||
| + | === Examples === | ||
| + | |||
| + | '''Example 1''' | ||
| + | :[[File:RS_Auto-Standard-Example1.png]] | ||
| + | :Record all Harry Potter films that pop up in the EPG and email notification. | ||
| + | |||
| + | ''' Example 2''' | ||
| + | :[[File:RS_Auto-Standard-Example2.png]] | ||
| + | :Record any episodes of Doctor Who showing on Christmas Day 2017 on BBC ONE HD and email notification. | ||
| + | |||
| + | '''Example 3''' | ||
| + | :[[File:RS_Auto-Standard-Example3.png]] | ||
| + | :Record the Formula 1 highlights from Channel 4 HD and email notification. | ||
| + | :Series link doesn't work reliably for this and often pulls in practice sessions, qualifying and the race. It rarely records subsequent races. | ||
| + | |||
| + | '''Example 4''' | ||
| + | :[[File:RS_Auto-Standard-Example4.png]] | ||
| + | :Send an email alert when any James Bond films, not featuring Pierce Brosnan are found in the EPG. | ||
| + | :NOTE:- the use of '+' and '-' forces a whole word search, with '*' as a wild card e.g. -bros* | ||
| + | |||
| + | '''Notes:''' | ||
| + | :* In example 4 above the -brosnan MUST follow a +keyword, a stand alone -keyword will always find zero matches. | ||
| + | :* If Type = Schedule the item will be scheduled and an email notification will be sent with a link to the RS EPG entry. | ||
| + | :* If Type = Email you will only be sent an email notification with an RS EPG link, so that a manual recording can be selected. | ||
| + | |||
| + | == Advanced Rules == | ||
| + | : [[File:RS_Auto-AdvancedRules.png]] | ||
| + | |||
| + | ==== Add Rule or Add New Entry ==== | ||
| + | |||
| + | ;Add Description | ||
| + | : [[File:RS_Auto-Advanced-Add1.png]] | ||
| + | : Enter description for rule and after you click on the [Create Rule] button the following will be created: | ||
| + | : [[File:RS_Auto-Advanced-Add2.png]] | ||
| + | |||
| + | ;Add Condition(s) | ||
| + | : At the left hand end of the rule there is a [+] icon which allows a new condition to be added: | ||
| + | : [[File:RS_Auto-Advanced-Add3.png]] | ||
| + | : The "Negate?" tick box negates the condition so that if you selected 'Channel name is' and then tick the 'negate' box, you end up with 'Channel name is NOT'. | ||
| + | : Select the condition required and after you click on the [Add Condition] button the following will be created: | ||
| + | : [[File:RS_Auto-Advanced-Add4.png]] | ||
| + | : At the end of the "If/And" part of the condition there is an edit icon which allows the value(s) to be changed: | ||
| + | : [[File:RS_Auto-Advanced-Add5.png]] | ||
| + | |||
| + | ==== HD/HDR-Fox T2 ==== | ||
| + | At the end of the "Then" part of the condition there is an edit icon which allows the value to be changed: | ||
| − | + | : [[File:RS_Auto-Advanced-Add6-T2.png]] | |
| − | |||
| − | |||
| − | |||
| − | |||
| − | |||
| − | |||
| − | |||
| − | |||
| − | |||
| − | + | ==== Foxsat-HDR ==== | |
| − | + | At the end of the "Then" part of the condition there is an edit icon which allows the value to be changed: | |
| − | + | ||
| − | + | : [[File:RS_Auto-Advanced-Add6-Foxsat.png]] | |
| − | + | ||
| − | + | You can add more condition(s) as required. | |
| − | |||
| − | |||
| − | == | + | ==== Quick Add ==== |
| − | = | + | : [[File:RS_Auto-Advanced-QuickAdd.png]] |
| − | + | ==== Save Changes ==== | |
| + | To save the rule(s) after they have been created, edited or deleted click on the <code>Save changes</code> button. | ||
| − | ==== | + | ==== Discard Changes ==== |
| − | + | To discard changes to rule(s) after they have been created, edited or deleted click on the <code>Discard changes</code> button. | |
| − | + | {{Note|This only applies to changes made since the last 'Save changes' was carried out.}} | |
| − | |||
| − | |||
| − | |||
| − | |||
| − | |||
| − | |||
| − | |||
| − | |||
| − | |||
| − | |||
| − | |||
| − | |||
| − | |||
| − | ==== | + | ==== Matching Events ==== |
| + | : [[File:RS_Auto-Advanced-MatchingEvents.png]] | ||
| − | + | At the end of each rule there is the [Matching Events] button which will display any matching events found. | |
| − | ==== | + | ==== Options ==== |
| + | At the end of each rule there are the following icons: | ||
| − | + | : [[File:RS_Auto-Advanced-Options.png]] | |
| − | {|class= | + | {| class=wikitable |
| − | + | | [[File:RS_Auto-Advanced-Options-Refresh.png]] || '''Refresh Rule''' || Enables all previously found CRID's for the current search to be emailed / scheduled again. | |
| − | |||
| − | |||
| − | | | ||
| − | |||
| − | |||
| − | |||
| − | |||
|- | |- | ||
| − | | | + | | [[File:RS_Auto-Advanced-Options-Edit.png]] || '''Edit Rule Text''' || Allows changes to the selected rule text. |
| − | | | ||
|- | |- | ||
| − | | | + | | [[File:RS_Auto-Advanced-Options-Enable.png]] || '''Enable/Disable Rule''' || Allows the rule to be enabled/disabled. |
| − | | | ||
| − | |||
| − | |||
|- | |- | ||
| − | | | + | | [[File:RS_Auto-Advanced-Options-Delete.png]] || '''Delete Rule''' || Removes the selected advanced rule. |
| − | |||
|- | |- | ||
| − | | | + | | [[File:RS_Auto-Advanced-Options-Duplicate.png]] || '''Duplicate Rule''' || Duplicates an existing search that can then be modified. |
| − | | | ||
|- | |- | ||
| − | | | + | | [[File:RS_Auto-Advanced-Options-MoveUp.png]] || '''Move Rule Up''' || Moves the selected rule up in the list. |
| − | |||
| − | |||
| − | |||
| − | |||
|- | |- | ||
| − | | | + | | [[File:RS_Auto-Advanced-Options-MoveDown.png]] || '''Move Rule Down''' || Moves the selected rule down in the list. |
| − | | | ||
|} | |} | ||
| − | === | + | ==== Examples ==== |
| + | |||
| + | '''Example 1''' | ||
| + | :[[File:RS_Auto-Advanced-Example1.png]] | ||
| + | : | ||
| + | :Record all Harry Potter films that pop up in the EPG and email notification. | ||
| − | + | '''Example 2''' | |
| − | + | :[[File:RS_Auto-Advanced-Example2.png]] | |
| − | + | : | |
| − | + | :Record any episodes of Doctor Who showing on Christmas Day 2017 on BBC ONE HD and email notification. | |
| − | + | ||
| − | + | '''Example 3''' | |
| − | + | :[[File:RS_Auto-Advanced-Example3.png]] | |
| − | + | : | |
| + | :Record the Formula 1 highlights from Channel 4 HD and email notification. | ||
| + | :Series link doesn't work reliably for this and often pulls in practice sessions, qualifying and the race. It rarely records subsequent races. | ||
| + | |||
| + | '''Example 4''' | ||
| + | :[[File:RS_Auto-Advanced-Example4.png]] | ||
| + | : | ||
| + | :Send an email alert when any James Bond films, not featuring Pierce Brosnan are found in the EPG. | ||
| + | :NOTE:- the use of '+' and '-' forces a whole word search, with '*' as a wild card e.g. -bros* | ||
| + | |||
| + | </tab><tab name="Visual"> | ||
| + | This page describes the [[File:RS_Visual-Button.png]] button on the [https://rs.hpkg.tv/ Remote Scheduling Web Site] | ||
---- | ---- | ||
| − | + | The Remote Scheduling Visual page provides an alternative view of scheduled and pending events, it also clearly displays any outstanding conflicts: | |
| − | + | ||
| − | + | [[File:RS_Visual.png|950px]] | |
| − | + | </tab><tab name="Disk"> | |
| − | + | This page describes the [[File:RS_Disk-Button.png]] button on the [https://rs.hpkg.tv/ Remote Scheduling Web Site] | |
| − | <tab name=" | ||
| − | |||
| − | |||
| − | |||
---- | ---- | ||
| − | + | == HD/HDR-Fox T2 == | |
| − | |||
| − | + | Clicking in the 'Pie Chart' symbol on any page will pull up a page showing your recordings. | |
| − | + | From here it is possible to set up a delete command that will be carried out the next time your Humax is in contact with the RS server. | |
| − | |||
| − | |||
| − | |||
| − | |||
| − | |||
| − | |||
| − | |||
| − | |||
| − | |||
| − | |||
| − | |||
| − | + | [[File:RS_Disk-Details-T2.png]] | |
| − | |||
| − | |||
| − | |||
| − | |||
| − | |||
| − | |||
| − | |||
| − | |||
| − | |||
| − | + | [[File:RS_Disk-DirectoryDetails-T2.png]] | |
| − | |||
| − | |||
| − | |||
| − | |||
| − | |||
| − | |||
| − | |||
| − | + | The various icons that can be displayed are detailed below: | |
| − | + | {| class=wikitable | |
| − | + | | [[File:RS_Disk-FolderParent.png]] || The parent folder, move up a level. | |
| − | + | |- | |
| − | + | | [[File:RS_Disk-FolderNew.png]] || The folder contains unwatched recordings, the number will be displayed. | |
| + | |- | ||
| + | | [[File:RS_Disk-FolderWatched.png]] || The folder contains only watched recordings or is empty. | ||
| + | |- | ||
| + | | [[File:RS_Disk-RecordingNew.png]] || The recording is unwatched. | ||
| + | |- | ||
| + | | [[File:RS_Disk-RecordingWatched.png]] || The recording has been watched. | ||
| + | |- | ||
| + | | [[File:RS_Disk-SD.png]] || The recording is in standard definition. | ||
| + | |- | ||
| + | | [[File:RS_Disk-HD.png]] || The recording is in high definition. | ||
| + | |} | ||
| + | |||
| + | ==== Deletion of Disk Contents ==== | ||
| − | + | There are 2 methods of deleting the disk contents: | |
| − | + | * Recordings and folders can be deleted individually by using the appropriate [Opt+] button: | |
| − | |||
| − | |||
| − | + | [[File:RS_Disk-Opt.png]] | |
| − | |||
| − | |||
| − | + | * Recordings and folders can be deleted by selecting individual recordings and folders and using the following buttons: | |
| − | |||
| − | |||
| − | + | [[File:RS_Disk-Selection.png]] | |
| − | |||
| − | |||
| − | |||
| − | + | As a safety measure, in order to delete a folder through the RS server the folder needs to contain no .ts files. | |
| − | + | If you want to delete the folder including all the .ts files you need to delete the .ts files first, then the folder. | |
| − | |||
| − | + | == Foxsat-HDR == | |
| − | + | Clicking in the 'Pie Chart' symbol on any page will pull up a page showing your recordings. | |
| − | + | From here it is possible to set up a delete command that will be carried out the next time your Humax is in contact with the RS server. | |
| + | [[File:RS_Disk-Details-Foxsat.png]] | ||
| − | + | [[File:RS_Disk-DirectoryDetails-Foxsat.png]] | |
| − | |||
| − | The | + | The various icons that can be displayed are detailed below: |
| − | + | {| class=wikitable | |
| + | | [[File:RS_Disk-FolderParent.png]] || The parent folder, move up a level. | ||
| + | |- | ||
| + | | [[File:RS_Disk-FolderNew.png]] || The folder contains unwatched recordings, the number will be displayed. | ||
| + | |- | ||
| + | | [[File:RS_Disk-FolderWatched.png]] || The folder contains only watched recordings or is empty. | ||
| + | |- | ||
| + | | [[File:RS_Disk-RecordingNew.png]] || The recording is unwatched. | ||
| + | |- | ||
| + | | [[File:RS_Disk-RecordingWatched.png]] || The recording has been watched. | ||
| + | |- | ||
| + | | [[File:RS_Disk-SD.png]] || The recording is in standard definition. | ||
| + | |- | ||
| + | | [[File:RS_Disk-HD.png]] || The recording is in high definition. | ||
| + | |- | ||
| + | | [[File:RS_Disk-Locked.png]] || The recording is locked and/or protected and requires the PIN to watch/delete. | ||
| + | |- | ||
| + | | [[File:RS_Disk-DLNA.png]] || The recording has been modified by the Convert Files Plug-in and is now more 'DLNA-friendly'. | ||
| + | |} | ||
| − | ==== | + | ==== Deletion of Disk Contents ==== |
| − | + | There are 2 methods of deleting the disk contents: | |
| − | + | * Recordings and folders can be deleted individually by using the appropriate [Opt+] button: | |
| − | |||
| − | |||
| − | |||
| − | + | [[File:RS_Disk-Opt.png]] | |
| − | |||
| − | |||
| − | |||
| − | + | * Recordings and folders can be deleted by selecting individual recordings and folders and using the following buttons: | |
| − | |||
| − | |||
| − | + | [[File:RS_Disk-Selection.png]] | |
| − | |||
| − | |||
| − | + | As a safety measure, in order to delete a folder through the RS server the folder needs to contain no .ts files. | |
| + | If you want to delete the folder including all the .ts files you need to delete the .ts files first, then the folder. | ||
| − | + | '''This differs from the Foxsat-HDR WebIf but this is the way Remote Scheduling for the HD/HDR-Fox T2 works.''' | |
| − | + | ==== Server Representation of Disk Contents ==== | |
| + | The server representation of disk contents focuses on non-transient state so if the Foxsat-HDR runs convertfiles while the box pushes the contents to the server this will not include the .tmp file (the original recording) and the size of the .ts file (the current progress of convertfiles) will be the size of the .tmp file. | ||
| − | + | </tab><tab name="Settings"> | |
| + | This page describes the [[File:RS_Settings-Button.png]] button on the [https://rs.hpkg.tv/ Remote Scheduling Web Site] | ||
| + | ---- | ||
| + | == HD/HDR-Fox T2 == | ||
| + | The following appears on the 'Settings' page: | ||
| − | === | + | ==== Account Settings ==== |
| + | [[File:RS_Settings-Account-HDR-T2.png]] | ||
| − | ==== | + | {| class=wikitable |
| − | + | | '''Registered Email Address''' || Your registered email address will be displayed here. | |
| − | + | |- | |
| − | + | | '''Hard Disk Problem Emails''' || Warning emails will be sent depending on: | |
| + | |- | ||
| + | | || On = Email notification of problems that arise will be sent daily at 7:15am. | ||
| + | |- | ||
| + | | || Off = No email notifications will be sent. | ||
| + | |- | ||
| + | | '''Upcoming Conflict Warning Emails''' || Warning emails will be sent depending on: | ||
| + | |- | ||
| + | | || On = Email notification of conflicts that arise will be sent daily at 7:15am. | ||
| + | |- | ||
| + | | || Off = No email notifications will be sent. | ||
| + | |- | ||
| + | | '''Failed Recording Warning Emails''' || Email notification of failed recordings will be sent depending on: | ||
| + | |- | ||
| + | | || On = Email notification of conflicts that arise will be sent. | ||
| + | |- | ||
| + | | || Off = No email notifications will be sent. | ||
| + | |- | ||
| + | | '''Hide OTA from Visual View''' || There is a daily event in the schedule for the OTA update. | ||
| + | |- | ||
| + | | || On = OTA event is not displayed in the Visual view. | ||
| + | |- | ||
| + | | || Off = OTA event is displayed in the Visual view. | ||
| + | |} | ||
| − | + | From here you can also change your password: | |
| − | |||
| − | |||
| − | |||
| − | |||
| − | + | [[File:RS_Settings-ChangePassword.png]] | |
| − | |||
| − | + | ==== EPG Settings ==== | |
| − | |||
| − | |||
| − | |||
| − | + | The EPG settings are: | |
| − | |||
| − | |||
| − | |||
| − | |||
| − | |||
| − | |||
| − | |||
| − | |||
| − | |||
| − | + | [[File:RS_Settings-EPG.png]] | |
| − | |||
| − | |||
| − | |||
| − | |||
| − | |||
| − | |||
| − | === | + | {| class=wikitable |
| + | | '''EPG Quick Access''' || Sets the default EPG access: | ||
| + | |- | ||
| + | | || On = Sets the EPG button to display the EPG. | ||
| + | |- | ||
| + | | || Off = Sets the EPG button to display an EPG/search pop-up. | ||
| + | |- | ||
| + | | '''Grid-style EPG''' || Sets the default EPG display: | ||
| + | |- | ||
| + | | || On = Sets the grid-style display. | ||
| + | |- | ||
| + | | || Off = Sets the standard now/next display. | ||
| + | |- | ||
| + | | '''Grid-style EPG Hours''' || Sets the number of hours displayed (grid-style only). | ||
| + | |- | ||
| + | | '''Grid EPG Fixed Scrolling''' || Sets the EPG scrolling: | ||
| + | |- | ||
| + | | || On = Scrolls the EPG within a fixed window. | ||
| + | |- | ||
| + | | || Off = Scrolls the whole page. | ||
| + | |- | ||
| + | | '''De-duplicate genre search results?''' || De-duplicate the search results depends on: | ||
| + | |- | ||
| + | | || On = Removes duplicate search results. | ||
| + | |- | ||
| + | | || Off = Leaves duplicate search results. | ||
| + | |} | ||
| − | ==== | + | ==== Devices ==== |
| − | |||
| − | |||
| − | |||
| − | + | The Device settings are: | |
| − | |||
| − | |||
| − | + | [[File:RS_Settings-Devices-HDR-T2.png]] | |
| − | |||
| − | { | + | {| class=wikitable |
| − | + | | '''Unique Identifier''' || Your unique identifier will be displayed here. | |
| + | |- | ||
| + | | '''MAC Address''' || Your Humax's MAC will be displayed here. | ||
| + | |- | ||
| + | | '''Description''' || If description is preceded with a '!' e.g. !My-Humax, then only the text after the '!' will be displayed in the Device page header, e.g. the host name and unit type will be omitted. | ||
| + | |- | ||
| + | | '''Model''' || Displays the Humax model. | ||
| + | |- | ||
| + | | '''HX/CFW/RS Versions''' || Displays the Humax Firmware/Custom Firmware/Remote Scheduling versions. | ||
| + | |- | ||
| + | | '''Disk Size''' || Displays the size of your hard disk drive & percentage used. | ||
| + | |- | ||
| + | | '''S.M.A.R.T. Status''' || Reports the status of the S.M.A.R.T. hard disk drive, if the Smartmontools package is installed. | ||
| + | |- | ||
| + | | '''EPG Region''' || Displays your region. | ||
| + | |- | ||
| + | | '''EPG Favourites Group''' || Which of the favorites set up in WebIf on the Humax itself you would like to use for channels on the server. | ||
| + | |- | ||
| + | | '''Order''' || Use this for ordering multiple devices on the server in the Humax list selectors. | ||
| + | |- | ||
| + | | '''Last Seen''' || Displays the time and date when your Humax last contacted the RS server. | ||
| + | |- | ||
| + | | '''Warn if not seen for''' || Send an email warning if the Humax hasn't been in contact with the server for x number of hours, specify x. | ||
| + | |} | ||
| − | == | + | == Foxsat-HDR == |
| − | + | The following appears on the 'Settings' page: | |
| − | |||
| − | |||
| − | |||
| − | |||
| − | |||
| − | |||
| − | |||
| − | + | ==== Account Settings ==== | |
| − | |||
| − | |||
| − | |||
| − | |||
| − | |||
| − | + | The Account settings are: | |
| − | + | [[File:RS_Settings-Account-Foxsat.png]] | |
| − | + | {| class=wikitable | |
| + | | '''Registered Email Address''' || Your registered email address will be displayed here. | ||
| + | |- | ||
| + | | '''Upcoming Conflict Warning Emails''' || Warning emails will be sent depending on: | ||
| + | |- | ||
| + | | || On = Email notification of conflicts that arise will be sent daily at 7:15am. | ||
| + | |- | ||
| + | | || Off = No email notifications will be sent. | ||
| + | |- | ||
| + | | '''Failed Recording Warning Emails''' || Email notification of failed recordings will be sent depending on: | ||
| + | |- | ||
| + | | || On = Email notification of conflicts that arise will be sent. | ||
| + | |- | ||
| + | | || Off = No email notifications will be sent. | ||
| + | |- | ||
| + | | '''Hide OTA from Visual View''' || HD/HDR-Fox T2 setting which is not required for the Foxsat-HDR | ||
| + | |- | ||
| + | | || On = Default setting. Has little effect if On or Off. | ||
| + | |} | ||
| + | From here you can also change your password: | ||
| − | + | [[File:RS_Settings-ChangePassword.png]] | |
| + | ==== EPG Settings ==== | ||
| + | The EPG settings are: | ||
| − | + | [[File:RS_Settings-EPG.png]] | |
| − | + | {| class=wikitable | |
| + | | '''EPG Quick Access''' || Sets the default EPG access: | ||
| + | |- | ||
| + | | || On = Sets the EPG button to display the EPG. | ||
| + | |- | ||
| + | | || Off = Sets the EPG button to display an EPG/search pop-up. | ||
| + | |- | ||
| + | | '''Grid-style EPG''' || Sets the default EPG display: | ||
| + | |- | ||
| + | | || On = Sets the grid-style display. | ||
| + | |- | ||
| + | | || Off = Sets the standard now/next display. | ||
| + | |- | ||
| + | | '''Grid-style EPG Hours''' || Sets the number of hours displayed (grid-style only). | ||
| + | |- | ||
| + | | '''Grid EPG Fixed Scrolling''' || Sets the EPG scrolling: | ||
| + | |- | ||
| + | | || On = Scrolls the EPG within a fixed window. | ||
| + | |- | ||
| + | | || Off = Scrolls the whole page. | ||
| + | |- | ||
| + | | '''De-duplicate genre search results?''' || De-duplicate the search results depends on: | ||
| + | |- | ||
| + | | || On = Removes duplicate search results. | ||
| + | |- | ||
| + | | || Off = Leaves duplicate search results. | ||
| + | |} | ||
| − | + | ==== Devices ==== | |
| − | + | The Device settings are: | |
| − | |||
| − | |||
| − | |||
| − | |||
| − | |||
| − | |||
| − | |||
| − | |||
| − | |||
| − | |||
| − | |||
| − | |||
| − | |||
| − | + | [[File:RS_Settings-Devices-Foxsat.png]] | |
| − | |||
| − | |||
| − | |||
| − | |||
| − | |||
| − | |||
| − | |||
| − | |||
| − | |||
| − | |||
| − | |||
| − | |||
| − | = | + | {| class=wikitable |
| − | + | | '''Unique Identifier''' || Your unique identifier will be displayed here. | |
| − | & | + | |- |
| − | + | | '''MAC Address''' || Your Humax's MAC will be displayed here. | |
| − | + | |- | |
| − | + | | '''Description''' || If description is preceded with a '!' e.g. !My-Humax, then only the text after the '!' will be displayed in the Device page header, e.g. the host name and unit type will be omitted. | |
| + | |- | ||
| + | | '''Model''' || Displays the Humax model. | ||
| + | |- | ||
| + | | '''HX/CFW/RS Versions''' || Displays the Humax Firmware/Custom Firmware/Remote Scheduling versions. | ||
| + | |- | ||
| + | | '''Disk Size''' || Displays the size of your hard disk drive & percentage used. | ||
| + | |- | ||
| + | | '''Satellite Feeds''' || Displays the number of satellite feeds: | ||
| + | |- | ||
| + | | || 1 - One feed available, only one recording at any given time is possible. | ||
| + | |- | ||
| + | | || 1.5 - Only one feed available but tuner 2 is looped with a cable from tuner 1 output, such that two compatible channels can be recorded at any given time. | ||
| + | |- Two channels are compatible if they're in the same frequency band (low/high, cutoff is at 11700 MHz, less than or equal to 11700 is Low Band, above 11700 is High Band) and have the same polarization (horizontal/vertical). Eg BBC1 HD, BBC2 HD, ITV1 HD, Channel 4 HD, More4 and E4 are all compatible with each other (Low Band Vertical), BBC4 HD, BBC News HD, Channel 5 HD, 5+1, 5+24, BBC Radio 5 Live and BBC Radio 5 Live Sports Extra are all compatible with each other (Low Band Horizontal). | ||
| + | | || 2 - Two independent feeds are available. | ||
| + | |- | ||
| + | | '''EPG Region''' || Displays your region. | ||
| + | |- | ||
| + | | '''EPG Favourites Group''' || Which of the favorites set up in WebIf on the Humax itself you would like to use for channels on the server. | ||
| + | |- | ||
| + | | '''Order''' || Use this for ordering multiple devices on the server in the Humax list selectors. | ||
| + | |- | ||
| + | | '''Last Seen''' || Displays the time and date when your Humax last contacted the RS server. | ||
| + | |- | ||
| + | | '''Warn if not seen for''' || Send an email warning if the Humax hasn't been in contact with the server for x number of hours, specify x. | ||
| + | |} | ||
| − | <tab | + | </tab><tab name="Logout"> |
| − | This | + | This page describes the [[File:RS_Logout-Button.png]] button on the [https://rs.hpkg.tv/ Remote Scheduling Web Site] |
| − | + | ---- | |
| + | When you click on the <code>Logout</code> button you will be logged out, without further confirmation and then the following page will be displayed: | ||
| − | + | [[File:RS_Logout.png|Logout Page]] | |
| − | |||
| − | |||
| − | |||
| − | |||
| − | |||
| − | |||
| − | |||
| − | |||
| − | |||
| − | |||
| − | <tab | + | </tab><tab name="Terms/Privacy Policy"> |
| − | + | This page describes the [[File:RS_Terms-Button.png]] button on the [https://rs.hpkg.tv/ Remote Scheduling Web Site] | |
| − | + | ---- | |
| − | + | When you click on the <code>Terms & Privacy Policy</code> button the Terms & Privacy Policy will be displayed. | |
| − | |||
| − | |||
| − | |||
</tab> | </tab> | ||
| + | </tabs> | ||
Latest revision as of 20:39, 31 August 2017
What is the Remote Scheduling Portal?
Remote Scheduling is a web site which enables you to manage your list of scheduled recordings while you're out and about, from anywhere with a web browser and Internet connection, without having to expose your Humax device to the Internet or leave it powered on.
As long as your Humax has Internet access and wakes up occasionally to check for updates or make a recording, it will work.
It allows you to perform the following:
- Schedule recording of a single/series/split/manual TV or radio event.
- Automatically schedule recording of a single/series event based on keywords/channel/time etc.
- Remove recording schedule.
- See disk contents.
- Delete a recorded program, useful when the box is running low on free space.
- Get warnings about failed recordings.
- See disk statistics (total/used/free space).
- See warnings about recording conflicts, eg when more than two concurrent recordings have been scheduled within the same time window.
HD/HDR-Fox T2
All commands are queued on the server and the box polls the server for commands every 8-12 minutes.
This means that it's a secure solution because you don't need to open up your firewall at home in order to use this (many similar systems are "push" instead of "pull").
At each startup the program waits a random time, up to 2 minutes, spreading out server communication in order to avoid that all boxes contact the server at the exact same time.
Most commands require a powercycle to take effect, except for "delete" and "reboot".
The "reboot" command is not carried out if the box is currently recording. Instead, the processing is stopped and not resumed until the box is no longer busy.
Foxsat-HDR
All commands are queued on the server and the box polls the server for commands every 10 minutes when the box isn't already busy, eg recording (the rs package depends on the crond package).
This means that it's a secure solution because you don't need to open up your firewall at home in order to use this (many similar systems are "push" instead of "pull").
At each startup the program waits a random time, up to 2 minutes, spreading out server communication in order to avoid that all boxes contact the server at the exact same time.
Most commands require a powercycle to take effect, except for "delete" and "reboot".
During the Housekeeper boot at 03:00 the box is supposed to do as little as possible so queued commands are not received and executed during this boot.
The "reboot" command is not carried out if the box is currently recording or converting (convertfiles). Instead, the processing is stopped and not resumed until the box is no longer busy.
If the system is currently running a convertfiles process when the disk contents is pushed to the server the .ts file size is taken from the .tmp file (the original) and the .tmp file is not sent to the server as the current .ts/.tmp files are transient.
Comparision of Features Available to Supported PVRs
Humax models supported are:
- HD-Fox T2
- HDR-Fox T2
- Foxsat-HDR
The following table compares the various features available to each model:
| Feature | HD-Fox T2 | HDR-Fox T2 | Foxsat-HDR | Notes |
|---|---|---|---|---|
| Home: | ||||
| Pending Schedule - Delete | Enabled | Enabled | Enabled | |
| Pending Schedule - Enable/Disable AR | Enabled | Enabled | Disabled | |
| Pending Schedule - Refresh Events | Enabled | Enabled | Disabled | |
| Pending Schedule - Change Folder | Enabled | Enabled | Enabled | |
| Active Schedule - Delete | Enabled | Enabled | Enabled | |
| Active Schedule - Enable/Disable AR | Enabled | Enabled | Disabled | |
| Active Schedule - Refresh Events | Enabled | Enabled | Disabled | |
| Active Schedule - Change Folder | Enabled | Enabled | Enabled | |
| EPG: | ||||
| EPG - Now/Next | Enabled | Enabled | Enabled | |
| EPG - Grid Style | Enabled | Enabled | Enabled | |
| EPG Searches | Enabled | Enabled | Enabled | |
| Record Series | Enabled | Enabled | Enabled | |
| Record Programme | Enabled | Enabled | Enabled | |
| Set Reminder | Enabled | Enabled | Disabled | |
| Recording Conflict Detection | Enabled | Enabled | Enabled | |
| Automatic Scheduling Feature: | ||||
| Email Matching Events | Enabled | Enabled | Enabled | |
| Email Matching Series | Enabled | Enabled | Enabled | |
| Schedule Matching Events | Enabled | Enabled | Enabled | |
| Schedule Matching Series | Enabled | Enabled | Enabled | |
| Schedule Reminders for Matching Events | Enabled | Enabled | Disabled | |
| Visual page provides an alternative view of: | ||||
| Scheduled Events | Enabled | Enabled | Enabled | |
| Pending Events | Enabled | Enabled | Enabled | |
| Conflicts | Enabled | Enabled | Enabled | |
| Recordings: | ||||
| Display Recording Details | Enabled | Enabled | Enabled | |
| Delete Recordings | Enabled | Enabled | Enabled | |
| Email Warnings: | ||||
| Hard Disk Problem | Enabled | Enabled | Disabled | |
| Upcoming Conflict(s) | Enabled | Enabled | Enabled | |
| Failed Recording(s) | Enabled | Enabled | Enabled | |
| WebIf Packages: | ||||
| recmon (Recording monitor) | Enabled | Enabled | Built in | Simplified recmon that'll report recorded programs after a few hours (instead of immediately when they finish recording as the T2 recmon package does) |
| Smartmontools (S.M.A.R.T. Status) | Enabled | Enabled | Disabled | |
Foxsat-HDR Port Differences
Most of the features have been ported with the following variations owing to differences in the two platforms (hardware or TV platform, ie Freeview vs Freesat):
- The custom channel names are used instead of default channel names.
- The server's conflict management has been extended to warn about conflicts for concurrent recordings on incompatible channels when only one satellite feed is available and tuner 1 is looped to tuner 2.
- Often the Housekeeper job removes scheduled split events so a method of converting these to one single manual event has been implemented. This currently only works on split events with two parts. Enabling this feature is controlled by the user.
- The Freesat guide is flaky and often single events don't have an ECRID, eg Click and The Film Review on BBC NEWS, which means that it can be difficult to schedule them for recording. Instead, scheduled single events missing an ECRID are converted to manual single events.
- Refresh of series events, skipping a series event, scheduling of reminders and changing scheduled events to use Accurate Recording are not supported by the Foxsat-HDR, hence these features are not provided on the RS server.
- Foxsat-HDR doesn't have a concept of pending schedules. These are instead simulated by taking a snapshot of the schedules at boot time and comparing actual schedules against this. This method isn't foolproof (eg a recording scheduled directly on the box using the remote control handset is regarded as pending and if the aforementioned recording is removed through WebIf or Remote Scheduling this will not take effect until after a reboot and in this case we create a dummy reboot pending record), however it hasn't been possible to find another way of handling pending schedules.
- Foxsat-HDR doesn't support the inotify interface in the Linux kernel so recmon hasn't been implemented. On the HDR-Fox T2 recmon is used to log a message on the box and the server as soon as a recording has finished, notifying that the given programme was recorded. Instead, a lazy recorded log mechanism has been implemented: Every few hours the recordings completed since the last reporting are logged on the box and the server, for instance:
16/02/2017 07:11:56 - Recorded: BBC2 HD 15 Feb 2017 19:55:00-21:04:48 Trust Me, I'm a Doctor (69 minutes, 2.30 GiB)- This means that recordings removed before the next reporting window will not be logged.
- rs_process is not a Jim/TCL program as the original but has instead been rewritten entirely in C++ owing to Jim file name clashes, major platform differences and also differences in the Jim language support.
- rs_process and rs binaries are installed in /opt/bin.
- Multi-mode Recording isn't supported.
- The Foxsat-HDR CFW doesn't have a S.M.A.R.T. interface, so no S.M.A.R.T. status is sent to/displayed by the RS server.
- The Foxsat-HDR CPU is quite slow compared to the HDR-Fox T2, so the rs_process program (the main controller) detects whether the system is too busy to carry out any commands. Specifically, the program terminates almost instantly when it starts up and detects that the number of currently playing/recording programs is larger than the user-configurable Max. Running Playbacks+Recordings value (default set to 0), regarding the system as being too busy. This means that the server is only queried for queued commands if the system is non-busy. No efforts are made towards detecting playbacks over DLNA and/or SMB, only directly on the box.
- For the same reason, only non-hidden channels are pushed to the server, in order to keep CPU/disk usage to a minimum. You control which channels are hidden in the WebIf Channel Editor.
- Non-Freesat channels aren't supported with Remote Scheduling as most of the channels don't have EPG entries.
- Foxsat-HDR doesn't show any actual padding assignment to the schedule so the pre/post padding shown by the RS server is a guestimate.
- The BBC region is determined based on the name of channel 101 using the following mappings, no other channels are used for determining the region:
| Channel | BBC Region | Net |
|---|---|---|
| BBC One CI | Channel Islands | 501 |
| BBC One East E | East (East) | 502 |
| BBC One East W | East (West) | 503 |
| BBC One E Mid | East Midlands | 504 |
| BBC One Lon | London | 505 |
| BBC One NE&C | North East & Cumbria | 506 |
| BBC One N West | North West | 507 |
| BBC One NI HD | Northern Ireland | 508 |
| BBC One ScotHD | Scotland | 509 |
| BBC One South | South | 510 |
| BBC One S East | South (East) | 511 |
| BBC One Oxford | South (Oxford) | 512 |
| BBC One S West | South West | 513 |
| BBC One Wal HD | Wales | 514 |
| BBC One West | West | 515 |
| BBC One W Mid | West Midlands | 516 |
| BBC One Yorks | Yorkshire | 517 |
| Other | Unknown | 518 |
Known Issues
HD/HDR-Fox T2
None.
Foxsat-HDR
- If you rename files to include special characters directly on the box with the remote control handset these characters are ASCII 8-bit, which means that the files will not be visible via WebIf, Samba and DLNA (although MediaTomb can be configured for this). Furthermore, they will disrupt the upload of disk content metadata to the RS server, which means that file names containing UTF-8 characters will not be handled correctly, eg you won't be able to delete them through the RS server.
- Gives incorrect boot reason if booted from WebIf version 2.88. Perhaps a future version of WebIf will fix this.
New Terms
- rs package
- The Remote Scheduling program that runs on your Humax (which needs to be running the Customised Firmware including the Web Interface package).
- https://rs.hpkg.tv/
- The Remote Scheduling website that captures your schedule requirements and synchronises them to your Humax at home.
Getting Started on the HD/HDR-Fox T2
If you are not already running the Customised Firmware then please have a look at the Wiki and Black Hole's threads at the top of the https://hummy.tv/forum/forums/hd-hdr-fox-t2-customised-firmware.28/ Forum which covers how to get started and ready to move on.
- Make sure you're running at least version 1.11 of the Customised Firmware (see Firmware Downloads).
- Install the latest WebIf and rs packages.
- See Wireless Users Notes below if you are connected via Wi-Fi.
- Go to the Settings page in your device's local web interface and register with the remote scheduling service.
- Wait for your initial password to arrive via email.
- Access https://rs.hpkg.tv/ and accept the Terms & Conditions to get started.
When you first log in there is some important information regarding what the site will and won't do and general Terms & Conditions to agree to before you can proceed. This gets you to the Home page which, to begin with, will show you the existing schedule details from your Hummy.
Wireless Users Notes
If your HD/HDR-Fox T2 is usually connected to your network via wireless, then it will not connect to the wireless network when it wakes up to make a recording. You can install the wireless-helper package to change this behaviour and increase the opportunities for your Humax to check for new recordings. The wireless-helper package currently only supports wireless networks using WPA or WPA2. It is planned to extend support to at least WEP in a future release.
Scheduling Sequence of Events
If your Humax is in standby when a new recording is Queued using Remote Scheduling, your Humax will not be aware of the new request until it is taken out of stand-by, when your Humax awakes the recording's status will move to Pending and a further stand-by >> awake cycle is required in order to make the new recording request move to Active. It is possible to remove the need for a further stand-by >> awake cycle by requesting a 'Scheduled Reboot' in the RS Home page so that the Humax will perform two reboots in one.
Frequency of Wake-up
To have the best chance of being able to successfully schedule a recording, you should set your HD/HDR-Fox T2 to wake up for 30 minutes at least once a day which is most easily done through the on-screen menus at Settings->Preferences->Time:

In conjunction with the overnight update check, this ensures that your device checks for new recordings at least twice a day. Any recordings that you have set will also enable the Humax to check for updates. It is also possible to schedule additional wake-up/sleep periods via the RS portal using the Additional Commands option which is below the list of scheduled recordings. You may wish to do this when going away from home for an extended period for example.
Getting Started on the Foxsat-HDR
If you are not already running the Customised Firmware then please have a look at https://www.avforums.com/threads/media-file-server-bundle-for-the-foxsat-hdr-release-4-part-6.2024876/ Forum which covers how to get started and ready to move on.
- Make sure you're running at least version 4.1.3 of the Customised Firmware and at least version 2.88 of the WebIf.
- Install the rs package.
- Go to the Settings page in your device's local web interface and register with the remote scheduling service.
- Wait for your initial password to arrive via email.
- Access https://rs.hpkg.tv/ and accept the Terms & Conditions to get started.
When you first log in there is some important information regarding what the site will and won't do and general Terms & Conditions to agree to before you can proceed. This gets you to the Home page which, to begin with, will show you the existing schedule details from your Hummy. The initial upload of your Hummy's channels, EPG and recording schedule can take several minutes, up to 10-15 minutes. You can limit the amount of data your Hummy sends by hiding the channels you don't need/use in the WebIf Channel Editor.
Scheduling Sequence of Events
If your Humax is in standby when a new recording is Queued using Remote Scheduling, your Humax will not be aware of the new request until it is taken out of stand-by, when your Humax awakes the recording's status will move to Pending and a further stand-by >> awake cycle is required in order to make the new recording request move to Active. It is possible to remove the need for a further stand-by >> awake cycle by requesting a 'Scheduled Reboot' in the RS Home page so that the Humax will perform two reboots in one.
Frequency of Wake-up
To have the best chance of being able to successfully schedule a recording, you should set your Humax to wake up for 30 minutes at least once a day which is most easily done through the on-screen menus at Menu->Settings->Time:

It is also possible to schedule additional wake-up/sleep periods through the on-screen menus at Schedule->Manual Watch reservation:

You may wish to do this when going away from home for an extended period for example.
![]() Note:
Once again, please keep in mind how RS queries queued server commands in relation to the setting of Max. Running Playbacks+Recordings (default set to 0). Specifically, if you expect RS to query and process queued server commands when the box is recording this doesn't happen unless Max. Running Playbacks+Recordings is set to a value larger than or equal to the number of recordings (plus playbacks) currently running on the box.
Note:
Once again, please keep in mind how RS queries queued server commands in relation to the setting of Max. Running Playbacks+Recordings (default set to 0). Specifically, if you expect RS to query and process queued server commands when the box is recording this doesn't happen unless Max. Running Playbacks+Recordings is set to a value larger than or equal to the number of recordings (plus playbacks) currently running on the box.
The Remote Scheduling server, which can be accessed from https://rs.hpkg.tv/ has a menu bar that remains on all pages:

The various buttons are explained via the tabs at the top of this page.
This page describes the ![]() button on the Remote Scheduling Web Site
button on the Remote Scheduling Web Site
The following appear on the 'Home' page:
Queued commands
These are the things you have done on the web site. Set recordings, deleted schedules. At this stage they are only held on the website until the next 10 minute 'sweep' or your Hummy wakes up and check the site.

Deleting Queued Items
You'll notice the Queued items list has a dustbin icon at the end of each line and this will remove the item from the queue and therefore won't sync with your Hummy.
Pending Events
The Humax knows about these items, but it needs a reboot in order to save them into the schedule list on the Humax so that they actually work as expected.

Deleting Pending Events
Click on the item in the Pending list and choose the Cancel Event option. This will create a cancellation line in the Queued commands list for each event to be deleted and will wait for the next sync between the site and your Humax.
Just like setting a recording the cancellation item will then sit in the Pending queue on your Humax until a restart takes place hence you can also send along a reboot action with the cancellation just like you can with a new recording. BUT like setting a recording, if your Humax is in standby it needs to wake up in order to sync in the first place. Less of a worry when deleting items as it's no problem to record something you now don't want any more (unless it conflicts with other recordings you want).
More Context Menu
HD/HDR Fox T2
Each event has the following items on the more context menu:

| Delete | Delete the selected event. |
| Disable AR | Disable Accurate Recording (AR) for the selected event. See "Multi-mode Recording" below. |
| Refresh Events | The Fox T2 schedule database contains a binary field aulEventToRecordInfo.
Refresh just blanks that field out on the next reboot which makes the Humax software re-populate it based on events in the current EPG. It's really a troubleshooting/diagnostic thing but can also be used to re-add any episodes which have been set up for skip. |
| Change Folder | Change the folder name to be used for series recodings. |
Foxsat-HDR
Each event has the following items on the more context menu:

| Delete | Delete the selected event. |
| Change Folder | Change the folder name to be used for series recodings. |
Active Events
These are all the items the Humax knows about AND will carry them out in full.

Deleting Active Events
Click on the item(s) in the Active list and then choose the [Delete Selected] button, or another option is to click [Delete] on the event's context menu.
To delete all finished events select the [Select Finished] button and then the [Delete Selected] button.
This will create a cancellation line in the Queued commands list for each event to be deleted and will wait for the next sync between the site and your Humax.
Just like setting a recording the cancellation item will then sit in the Pending queue on the Humax until a restart takes place hence you can also send along a reboot action with the cancellation just like you can with a new recording. BUT like setting a recording, if your Humax is in standby it needs to wake up in order to sync in the first place. Less of a worry when deleting items as it's no problem to record something you now don't want any more (unless it conflicts with other recordings you want).
More Context Menu
HD/HDR-Fox-T2
See "Pending Events", "More Context Menu", "HD/HDR-Fox T2" which is the same.
Foxsat-HDR
See "Pending Events", "More Context Menu", "Foxsat-HDR" which is the same.
Additional Commands
HD/HDR-Fox T2
At the end of the Active list there are the following buttons:
![]() - Schedule a Reboot.
- Schedule a Reboot.
![]() - Create a Manual Event (a recording or reminder).
- Create a Manual Event (a recording or reminder).
![]() - View the Raw Database.
- View the Raw Database.
Foxsat-HDR
At the end of the Active list there are the following buttons:
![]() - Schedule a Reboot.
- Schedule a Reboot.
![]() - Create a Manual Event (recording only).
- Create a Manual Event (recording only).
![]() - View the Raw Database.
- View the Raw Database.
Recent Activity
This is a simple view of an event log - it's not meant to be an exhaustive audit trail but it does confirm that things are happening and when they happened.

You can see a more detailed list of every event tracked by clicking the More button and then even more detail via the Show diagnostic entries button.
You can also delete the contents of the log file via the [Delete log entries] button.
Top 10/500 list
Clicking on a programme in the Top 10/500 list will display all broadcast times for that programme with the ability to set up a recording from there.

This page describes the ![]() button on the Remote Scheduling Web Site
--
button on the Remote Scheduling Web Site
--
![]() Note:
Remote Scheduling doesn't automatically detect changes in the channel lineup or the WebIf Favourite lists.
With any change to these you will have to run the following from a command line on the box in order to push the changes to the server.
This applies to the HD/HDR-Fox T2 and Foxsat-HDR:
Note:
Remote Scheduling doesn't automatically detect changes in the channel lineup or the WebIf Favourite lists.
With any change to these you will have to run the following from a command line on the box in order to push the changes to the server.
This applies to the HD/HDR-Fox T2 and Foxsat-HDR:
rs push channels
The following appear on the 'EPG' page:
EPG - Now/Next
Clicking a specific programme displays a pop-up with details from the EPG (Electronic Programme Guide). Clicking the Channel name hyperlink will display all EPG entries for that channel.

You can switch to the grid display by clicking on the Grid EPG button.
EPG - Grid Style
Where programs are of a duration too short to display in the grid, the title hyperlink is truncated, which can be clicked to see the full programme EPG information in the same way as the Now/Next EPG function. Clicking the Channel name hyperlink will display all EPG entries for that channel.

You can switch to the Now/Next display by clicking on the Now/Next button.
The cell width is adjustable to avoid left to right scrolling.
Note that the narrower settings for cell width will result in more programme titles not being displayed in full on the EPG 7-day page.
But if you hover over the programme a pop-up window will display the full title and start/end times.
Set a value that works best for you. See the Settings button below.
The Navigation bar enables:
- Selecting the time range displayed.
- Selecting 'Now', the current day & time.
- Selecting the required day.

EPG Searches
The EPG page provides 2 methods of searching for programs which covers the full 7 days.
1. EPG Search
Will search the EPG data for specific text in the programme title (and optionally the programme description). By default, results are filtered by the standard Channel List mechanism although this can be over-ridden in the case of a search.

You can use the following operators and rules to refine/enhance the search results:
| + | stands for AND |
| - | stands for NOT |
| no operator | implies OR |
| "two words" | in quotes must appear together |
| +doctor +(amy tardis) | containing 'doctor' and one of 'amy' or 'tardis' |
2. Content Type Searches
Will search the EPG data on the content type (genre). The results are filtered by the standard Channel List mechanism.

Scheduling a Recording
HD/HDR-Fox T2
Click on the programme name that you want to schedule and you will get a dialogue box with more detailed programme info, plus buttons at the bottom to record the series, just the program, set a reminder or cancel.

No recording option buttons will be displayed for programmes already scheduled for recording.
Confirmation of the successful or otherwise setting of the recording will be shown in a banner at the top of the page:
![]()
Once this is done the Home page will now show a section at the top called Queued commands - at this stage these are only stored on the website awaiting a sync with your HD/HDR-Fox T2. Every 10-12 minutes or so (or on next reboot if the HD/HDR-Fox T2 is on standby) your HD/HDR-Fox T2 will contact the site to see if there is anything to sync and if there are items in Queued commands they will be picked up and copied over to your HD/HDR-Fox T2, and then they will appear in a Pending list. There is a 'last seen' time/date stamp at the top of the Home Page so you know if the site is seeing your Humax.
Please note that due to the way the core HD/HDR-Fox T2 software works a restart of the HD/HDR-Fox T2 is then required in order for Pending items to actually take place.
This is why items in the Queued commands list also have a button for Schedule Reboot - if you click this a reboot command is also sent to the HD/HDR-Fox T2 along with your recordings, and the HD/HDR-Fox T2 will restart itself shortly after synchronising the Queued commands thus ensuring your recordings/changes take place.

All HD/HDR-Fox T2 have an auto update task at 4:30 am every morning so at worst case they wake up every morning and any Pending Items already on the Humax will become active. Otherwise if you have the HD/HDR-Fox T2 on standby when you are not there you may want to schedule a power cycle or two so that the HD/HDR-Fox T2 wakes up and can pick up any Queued and/or Pending items and incorporate them fully into the schedule (there is a function for this under Additional Commands).
You can force a sync from the command line with:
/mod/sbin/rs_process now
To push the schedule from the command line use:
rs push
Don't forget that if you have the HD/HDR-Fox T2 on standby when you make the schedule then it'll need one wake up to pick up the scheduled item(s), then another in order to successfully incorporate them into the schedule on the HD/HDR-Fox T2. You can send the second reboot along with the schedule but the first has to already be defined on the HD/HDR-Fox T2 (either the built in daily 4:30am auto update or wake up/sleep cycles you can program yourself).
Foxsat-HDR
Click on the programme name that you want to schedule and you will get a dialogue box with more detailed programme info, plus buttons at the bottom to record the series, just the programme or cancel.

No recording option buttons will be displayed for programmes already scheduled for recording.
Confirmation of the successful or otherwise setting of the recording will be shown in a banner at the top of the page:
![]()
Once this is done the Home page will now show a section at the top called Queued commands - at this stage these are only stored on the website awaiting a sync with your Foxsat-HDR. Every 10-12 minutes or so (or on next reboot if the Foxsat-HDR is on standby) your Foxsat-HDR will contact the site to see if there is anything to sync and if there are items in Queued commands they will be picked up and copied over to your Foxsat-HDR, and then they will appear in a Pending list. There is a 'last seen' time/date stamp at the top of the Home Page so you know if the site is seeing your Humax.
Please note that due to the way the core Foxsat-HDR software works a restart of the Humax is then required in order for Pending items to actually take place.
This is why items in the Queued commands list also have a button for Schedule Reboot - if you click this a reboot command is also sent to the Humax along with your recordings, and the Foxsat-HDR will restart itself shortly after synchronising the Queued commands thus ensuring your recordings/changes take place.
You need to have set up at least one daily wake up/sleep cycle and any Pending Items already on the Foxsat-HDR will become active. Otherwise if you have the Foxsat-HDR on standby when you are not there you may want to schedule a power cycle or two so that the Foxsat-HDR wakes up and can pick up any Queued and/or Pending items and incorporate them fully into the schedule.
You can force a sync from the command line with:
rs_process now
To push the schedule from the command line use:
rs push
Don't forget that if you have the Foxsat-HDR on standby when you make the schedule then it'll need one wake up to pick up the scheduled item(s), then another in order to successfully incorporate them into the schedule on the Foxsat-HDR. You can send the second reboot along with the schedule but the first has to already be defined on the Foxsat-HDR, see 'Getting Started'-> 'Frequency of Wake-up'-> 'Foxsat-HDR' above.
Reminder
- Queued commands are not received and executed when the number of currently playing/recording programs is larger than the user-configurable Max. Running Playbacks+Recordings value (default set to 0), regarding the system as being too busy.
- During the Housekeeper boot at 03:00 the box is supposed to do as little as possible so Queued commands are not received and executed during this boot.
Recording Conflict Detection
The scheduling mechanism will check for recording conflicts each time a new recording is scheduled.
If a schedule conflict is detected, all conflicting recordings will be displayed in the pop-up window:

![]() Note:
For this to work correctly on the Foxsat-HDR you must first set the number of satellite feeds available to your Foxsat-HDR in the 'RemoteScheduling Plug-in Settings' section on the 'Settings' page of the Web Interface.
Note:
For this to work correctly on the Foxsat-HDR you must first set the number of satellite feeds available to your Foxsat-HDR in the 'RemoteScheduling Plug-in Settings' section on the 'Settings' page of the Web Interface.
This page describes the ![]() button on the Remote Scheduling Web Site
button on the Remote Scheduling Web Site
The Remote Scheduling Portal includes an automatic scheduling feature. This allows you to set up rules which are matched against the EPG data as it comes in eight days ahead. When a match is found, it's possible to either have it send you an email message, or to attempt to automatically schedule the recording on your behalf.
There are 2 types of rules:
Standard Rules

Add New Rule

- Type
- The type of rule, either Email which causes emails to be sent when matches are found or Schedule which attempts to schedule any events found and also emails notification of the schedule.
- Subtype
- Whether to treat matches as single events or, if possible, series.
- Date
- If specified, only match events which occur on this date.
- Day
- If specified, only match events which occur on this day or set of days (e.g. weekdays). Note that if you use this to only schedule events occurring on particular days then you should most likely be using the Schedule Events option rather than Schedule Series. If you schedule the series then the day restriction will only apply to the original matching event - you will get the rest of the series regardless of the day.
- Start Time
- If specified, only match events which start between the times provided.
- Channel
- If specified, only match events shown on this channel.
- Content Type
- If specified, only match events with this content type (as set by the content provider).
- Name
- Part of the EPG name to match. This supports wild cards, '*' for 0 or more characters, '?' for exactly one character. It is matched against the EPG as a substring.
- Synopsis
- Part of the EPG synopsis. This supports the same wild cards as name.
More Context Menu
Each rule has the following items on the more context menu:

| Edit | Allows changes to an existing Auto search. |
| Delete | Removes a single standard rule. |
| Disable/Enable Rule | Allows the rule to be disabled/enabled. |
| Convert to Advanced | Converts standard to advanced rule. |
| Show Matching Events | Displays a current search results for the current 'Auto' search. |
| Reset Matched Events | Enables all previously found CRID's for the current search to be emailed / scheduled again. |
Examples
Example 1
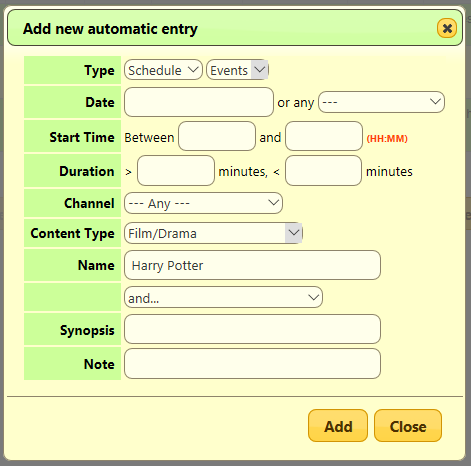
- Record all Harry Potter films that pop up in the EPG and email notification.

Example 2
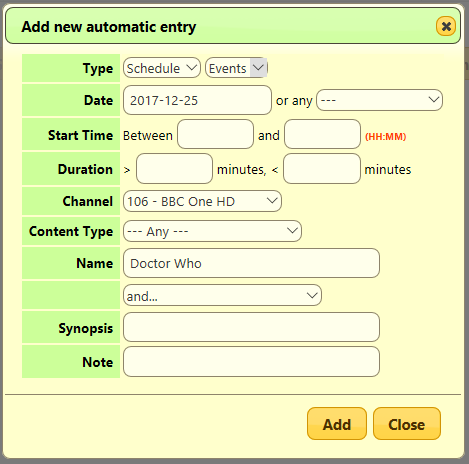
- Record any episodes of Doctor Who showing on Christmas Day 2017 on BBC ONE HD and email notification.

Example 3
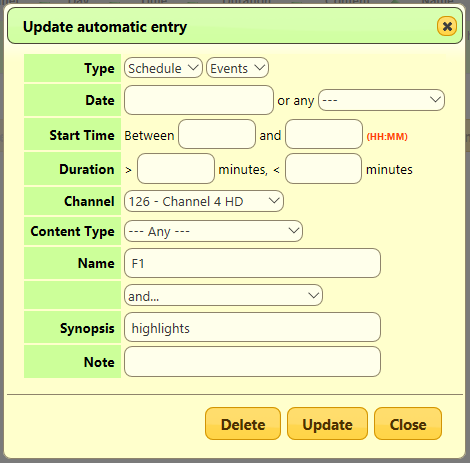
- Record the Formula 1 highlights from Channel 4 HD and email notification.
- Series link doesn't work reliably for this and often pulls in practice sessions, qualifying and the race. It rarely records subsequent races.

Example 4
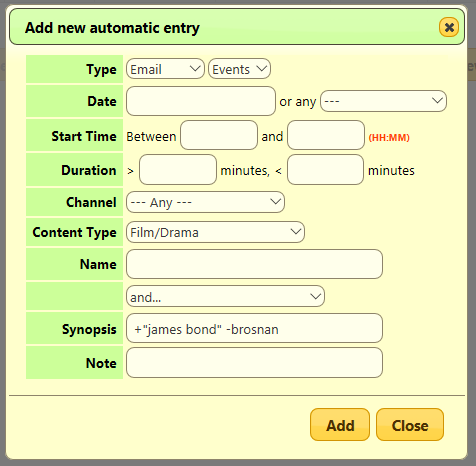
- Send an email alert when any James Bond films, not featuring Pierce Brosnan are found in the EPG.
- NOTE:- the use of '+' and '-' forces a whole word search, with '*' as a wild card e.g. -bros*

Notes:
- In example 4 above the -brosnan MUST follow a +keyword, a stand alone -keyword will always find zero matches.
- If Type = Schedule the item will be scheduled and an email notification will be sent with a link to the RS EPG entry.
- If Type = Email you will only be sent an email notification with an RS EPG link, so that a manual recording can be selected.
Advanced Rules

Add Rule or Add New Entry
- Add Description
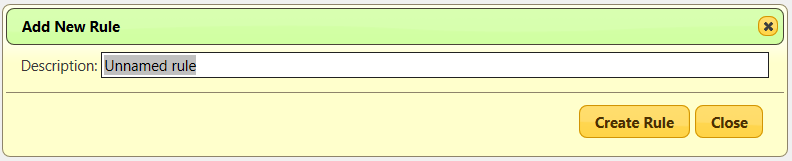
- Enter description for rule and after you click on the [Create Rule] button the following will be created:


- Add Condition(s)
- At the left hand end of the rule there is a [+] icon which allows a new condition to be added:
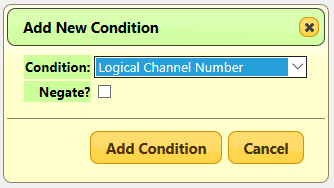
- The "Negate?" tick box negates the condition so that if you selected 'Channel name is' and then tick the 'negate' box, you end up with 'Channel name is NOT'.
- Select the condition required and after you click on the [Add Condition] button the following will be created:

- At the end of the "If/And" part of the condition there is an edit icon which allows the value(s) to be changed:


HD/HDR-Fox T2
At the end of the "Then" part of the condition there is an edit icon which allows the value to be changed:

Foxsat-HDR
At the end of the "Then" part of the condition there is an edit icon which allows the value to be changed:

You can add more condition(s) as required.
Quick Add

Save Changes
To save the rule(s) after they have been created, edited or deleted click on the Save changes button.
Discard Changes
To discard changes to rule(s) after they have been created, edited or deleted click on the Discard changes button.
![]() Note:
This only applies to changes made since the last 'Save changes' was carried out.
Note:
This only applies to changes made since the last 'Save changes' was carried out.
Matching Events

At the end of each rule there is the [Matching Events] button which will display any matching events found.
Options
At the end of each rule there are the following icons:
| Refresh Rule | Enables all previously found CRID's for the current search to be emailed / scheduled again. | |
| Edit Rule Text | Allows changes to the selected rule text. | |
| Enable/Disable Rule | Allows the rule to be enabled/disabled. | |
| Delete Rule | Removes the selected advanced rule. | |
| Duplicate Rule | Duplicates an existing search that can then be modified. | |
| Move Rule Up | Moves the selected rule up in the list. | |
| Move Rule Down | Moves the selected rule down in the list. |
Examples
Example 1

- Record all Harry Potter films that pop up in the EPG and email notification.

Example 2

- Record any episodes of Doctor Who showing on Christmas Day 2017 on BBC ONE HD and email notification.

Example 3

- Record the Formula 1 highlights from Channel 4 HD and email notification.
- Series link doesn't work reliably for this and often pulls in practice sessions, qualifying and the race. It rarely records subsequent races.

Example 4

- Send an email alert when any James Bond films, not featuring Pierce Brosnan are found in the EPG.
- NOTE:- the use of '+' and '-' forces a whole word search, with '*' as a wild card e.g. -bros*

This page describes the ![]() button on the Remote Scheduling Web Site
button on the Remote Scheduling Web Site
The Remote Scheduling Visual page provides an alternative view of scheduled and pending events, it also clearly displays any outstanding conflicts:

This page describes the ![]() button on the Remote Scheduling Web Site
button on the Remote Scheduling Web Site
HD/HDR-Fox T2
Clicking in the 'Pie Chart' symbol on any page will pull up a page showing your recordings. From here it is possible to set up a delete command that will be carried out the next time your Humax is in contact with the RS server.


The various icons that can be displayed are detailed below:
| The parent folder, move up a level. | |
| The folder contains unwatched recordings, the number will be displayed. | |
| The folder contains only watched recordings or is empty. | |
| The recording is unwatched. | |
| The recording has been watched. | |
| The recording is in standard definition. | |
| The recording is in high definition. |
Deletion of Disk Contents
There are 2 methods of deleting the disk contents:
- Recordings and folders can be deleted individually by using the appropriate [Opt+] button:

- Recordings and folders can be deleted by selecting individual recordings and folders and using the following buttons:
![]()
As a safety measure, in order to delete a folder through the RS server the folder needs to contain no .ts files. If you want to delete the folder including all the .ts files you need to delete the .ts files first, then the folder.
Foxsat-HDR
Clicking in the 'Pie Chart' symbol on any page will pull up a page showing your recordings. From here it is possible to set up a delete command that will be carried out the next time your Humax is in contact with the RS server.


The various icons that can be displayed are detailed below:
| The parent folder, move up a level. | |
| The folder contains unwatched recordings, the number will be displayed. | |
| The folder contains only watched recordings or is empty. | |
| The recording is unwatched. | |
| The recording has been watched. | |
| The recording is in standard definition. | |
| The recording is in high definition. | |
| The recording is locked and/or protected and requires the PIN to watch/delete. | |
| The recording has been modified by the Convert Files Plug-in and is now more 'DLNA-friendly'. |
Deletion of Disk Contents
There are 2 methods of deleting the disk contents:
- Recordings and folders can be deleted individually by using the appropriate [Opt+] button:
- Recordings and folders can be deleted by selecting individual recordings and folders and using the following buttons:
![]()
As a safety measure, in order to delete a folder through the RS server the folder needs to contain no .ts files. If you want to delete the folder including all the .ts files you need to delete the .ts files first, then the folder.
This differs from the Foxsat-HDR WebIf but this is the way Remote Scheduling for the HD/HDR-Fox T2 works.
Server Representation of Disk Contents
The server representation of disk contents focuses on non-transient state so if the Foxsat-HDR runs convertfiles while the box pushes the contents to the server this will not include the .tmp file (the original recording) and the size of the .ts file (the current progress of convertfiles) will be the size of the .tmp file.
This page describes the ![]() button on the Remote Scheduling Web Site
button on the Remote Scheduling Web Site
HD/HDR-Fox T2
The following appears on the 'Settings' page:
Account Settings

| Registered Email Address | Your registered email address will be displayed here. |
| Hard Disk Problem Emails | Warning emails will be sent depending on: |
| On = Email notification of problems that arise will be sent daily at 7:15am. | |
| Off = No email notifications will be sent. | |
| Upcoming Conflict Warning Emails | Warning emails will be sent depending on: |
| On = Email notification of conflicts that arise will be sent daily at 7:15am. | |
| Off = No email notifications will be sent. | |
| Failed Recording Warning Emails | Email notification of failed recordings will be sent depending on: |
| On = Email notification of conflicts that arise will be sent. | |
| Off = No email notifications will be sent. | |
| Hide OTA from Visual View | There is a daily event in the schedule for the OTA update. |
| On = OTA event is not displayed in the Visual view. | |
| Off = OTA event is displayed in the Visual view. |
From here you can also change your password:

EPG Settings
The EPG settings are:

| EPG Quick Access | Sets the default EPG access: |
| On = Sets the EPG button to display the EPG. | |
| Off = Sets the EPG button to display an EPG/search pop-up. | |
| Grid-style EPG | Sets the default EPG display: |
| On = Sets the grid-style display. | |
| Off = Sets the standard now/next display. | |
| Grid-style EPG Hours | Sets the number of hours displayed (grid-style only). |
| Grid EPG Fixed Scrolling | Sets the EPG scrolling: |
| On = Scrolls the EPG within a fixed window. | |
| Off = Scrolls the whole page. | |
| De-duplicate genre search results? | De-duplicate the search results depends on: |
| On = Removes duplicate search results. | |
| Off = Leaves duplicate search results. |
Devices
The Device settings are:

| Unique Identifier | Your unique identifier will be displayed here. |
| MAC Address | Your Humax's MAC will be displayed here. |
| Description | If description is preceded with a '!' e.g. !My-Humax, then only the text after the '!' will be displayed in the Device page header, e.g. the host name and unit type will be omitted. |
| Model | Displays the Humax model. |
| HX/CFW/RS Versions | Displays the Humax Firmware/Custom Firmware/Remote Scheduling versions. |
| Disk Size | Displays the size of your hard disk drive & percentage used. |
| S.M.A.R.T. Status | Reports the status of the S.M.A.R.T. hard disk drive, if the Smartmontools package is installed. |
| EPG Region | Displays your region. |
| EPG Favourites Group | Which of the favorites set up in WebIf on the Humax itself you would like to use for channels on the server. |
| Order | Use this for ordering multiple devices on the server in the Humax list selectors. |
| Last Seen | Displays the time and date when your Humax last contacted the RS server. |
| Warn if not seen for | Send an email warning if the Humax hasn't been in contact with the server for x number of hours, specify x. |
Foxsat-HDR
The following appears on the 'Settings' page:
Account Settings
The Account settings are:

| Registered Email Address | Your registered email address will be displayed here. |
| Upcoming Conflict Warning Emails | Warning emails will be sent depending on: |
| On = Email notification of conflicts that arise will be sent daily at 7:15am. | |
| Off = No email notifications will be sent. | |
| Failed Recording Warning Emails | Email notification of failed recordings will be sent depending on: |
| On = Email notification of conflicts that arise will be sent. | |
| Off = No email notifications will be sent. | |
| Hide OTA from Visual View | HD/HDR-Fox T2 setting which is not required for the Foxsat-HDR |
| On = Default setting. Has little effect if On or Off. |
From here you can also change your password:
EPG Settings
The EPG settings are:
| EPG Quick Access | Sets the default EPG access: |
| On = Sets the EPG button to display the EPG. | |
| Off = Sets the EPG button to display an EPG/search pop-up. | |
| Grid-style EPG | Sets the default EPG display: |
| On = Sets the grid-style display. | |
| Off = Sets the standard now/next display. | |
| Grid-style EPG Hours | Sets the number of hours displayed (grid-style only). |
| Grid EPG Fixed Scrolling | Sets the EPG scrolling: |
| On = Scrolls the EPG within a fixed window. | |
| Off = Scrolls the whole page. | |
| De-duplicate genre search results? | De-duplicate the search results depends on: |
| On = Removes duplicate search results. | |
| Off = Leaves duplicate search results. |
Devices
The Device settings are:

| Unique Identifier | Your unique identifier will be displayed here. |
| MAC Address | Your Humax's MAC will be displayed here. |
| Description | If description is preceded with a '!' e.g. !My-Humax, then only the text after the '!' will be displayed in the Device page header, e.g. the host name and unit type will be omitted. |
| Model | Displays the Humax model. |
| HX/CFW/RS Versions | Displays the Humax Firmware/Custom Firmware/Remote Scheduling versions. |
| Disk Size | Displays the size of your hard disk drive & percentage used. |
| Satellite Feeds | Displays the number of satellite feeds: |
| 1 - One feed available, only one recording at any given time is possible. | |
| 1.5 - Only one feed available but tuner 2 is looped with a cable from tuner 1 output, such that two compatible channels can be recorded at any given time. | |
| 2 - Two independent feeds are available. | |
| EPG Region | Displays your region. |
| EPG Favourites Group | Which of the favorites set up in WebIf on the Humax itself you would like to use for channels on the server. |
| Order | Use this for ordering multiple devices on the server in the Humax list selectors. |
| Last Seen | Displays the time and date when your Humax last contacted the RS server. |
| Warn if not seen for | Send an email warning if the Humax hasn't been in contact with the server for x number of hours, specify x. |
This page describes the ![]() button on the Remote Scheduling Web Site
button on the Remote Scheduling Web Site
When you click on the Logout button you will be logged out, without further confirmation and then the following page will be displayed:

This page describes the ![]() button on the Remote Scheduling Web Site
button on the Remote Scheduling Web Site
When you click on the Terms & Privacy Policy button the Terms & Privacy Policy will be displayed.