Difference between revisions of "Foxlink"
Ezra pound (talk | contribs) |
Ezra pound (talk | contribs) |
||
| (4 intermediate revisions by the same user not shown) | |||
| Line 1: | Line 1: | ||
| − | |||
| − | |||
===Background=== | ===Background=== | ||
| − | A fair number of people who own a HDR Fox-T2 purchase one or more HD Fox-T2 boxes to use elsewhere in the house and find that the built-in DLNA playback functionality leaves a lot to be desired. The | + | A fair number of people who own a HDR Fox-T2 purchase one or more HD Fox-T2 boxes to use elsewhere in the house and find that the built-in DLNA playback functionality leaves a lot to be desired. The Foxlink package simplifies the process by providing an easy method for linking HDR to HD or HDR to HDR. Foxlink is best used in conjunction with the latest version of the web interface which provides recursive ongoing decryption |
| − | ==Installation== | + | ===Installation=== |
| − | On the HDR Fox- | + | On the HDR-Fox T2 / HDR-Fox T2s: |
| − | + | *Install the Customised Firmware and initial environment, including web interface; | |
| − | + | *Install the nfs-utils package; | |
| − | + | *For HDR to HDR linking, install the virtual-disk2 package | |
| + | *Flag the top-level media directory for recursive decrypt. | ||
On the HD Fox T2: | On the HD Fox T2: | ||
| − | + | *Install the Customised Firmware; | |
| − | + | *Install the Customised Firmware environment - straightforward if a hard disk is attached to enable recording otherwise a small USB Flash Drive can be prepared - see [[Converting_a_USB_Flash_Drive_to_EXT2_on_a_HD-Fox_T2|'''Link Here''']] | |
| − | + | *Install the foxlink package. | |
===Configuration=== | ===Configuration=== | ||
| − | + | Configure the foxlink package via the web interface settings screen:- | |
| + | |||
| + | [[File:foxlink-config.png]] | ||
| + | |||
| + | The contents of the HDR will appear as a virtual disk that should be displayed as an option when you go into the media list. You can customise the directory name - I use Downstairs. | ||
| + | |||
| + | Foxlink doesn't do anything that the existing network-shares-automount can't do but is much simpler to configure and doesn't create the file-based configuration tree that some people find distracting. If you need any more functionality than a simple one-way link from a HD to a HDR then you should use network-shares-automount. | ||
| + | |||
| + | Foxlink utilises NFS to link the boxes together in preference to Samba | ||
| + | |||
| + | '''NOTE''' | ||
| − | + | Foxlink can take a minute or so to start up following a switch on from standby | |
Latest revision as of 15:23, 7 October 2018
Background
A fair number of people who own a HDR Fox-T2 purchase one or more HD Fox-T2 boxes to use elsewhere in the house and find that the built-in DLNA playback functionality leaves a lot to be desired. The Foxlink package simplifies the process by providing an easy method for linking HDR to HD or HDR to HDR. Foxlink is best used in conjunction with the latest version of the web interface which provides recursive ongoing decryption
Installation
On the HDR-Fox T2 / HDR-Fox T2s:
- Install the Customised Firmware and initial environment, including web interface;
- Install the nfs-utils package;
- For HDR to HDR linking, install the virtual-disk2 package
- Flag the top-level media directory for recursive decrypt.
On the HD Fox T2:
- Install the Customised Firmware;
- Install the Customised Firmware environment - straightforward if a hard disk is attached to enable recording otherwise a small USB Flash Drive can be prepared - see Link Here
- Install the foxlink package.
Configuration
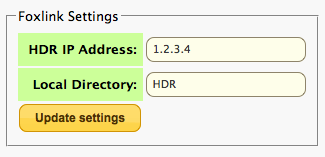
Configure the foxlink package via the web interface settings screen:-
The contents of the HDR will appear as a virtual disk that should be displayed as an option when you go into the media list. You can customise the directory name - I use Downstairs.
Foxlink doesn't do anything that the existing network-shares-automount can't do but is much simpler to configure and doesn't create the file-based configuration tree that some people find distracting. If you need any more functionality than a simple one-way link from a HD to a HDR then you should use network-shares-automount.
Foxlink utilises NFS to link the boxes together in preference to Samba
NOTE
Foxlink can take a minute or so to start up following a switch on from standby
