Difference between revisions of "Install Full Web Interface"
Ezra pound (talk | contribs) |
Ezra pound (talk | contribs) |
||
| (9 intermediate revisions by 2 users not shown) | |||
| Line 1: | Line 1: | ||
| − | Once the custom firmware has been successfully installed, a simple web interface will be available | + | Once the custom firmware has been successfully installed via USB, a simple web interface will be available by entering your Humax's IP address into a web browser. First, verify that your Humax has Internet access by using the Humax TV Portal to access some content. Then, using a web browser on a computer connected to the same network as the Humax, enter the IP address which has been assigned to the Humax into the address bar e.g. :- |
| + | <pre> | ||
| + | 10.0.0.200 | ||
| + | </pre> | ||
| − | + | To determine the IP address of your Humax, use the TV On-screen menus to navigate to MENU >> SETTINGS >> SYSTEM >> INTERNET SETTINGS >> CONFIGURE LAN >> IP Address | |
| − | + | Then enter that IP address directly into the address of your favourite web browser (this process has been reported to work with Firefox, Internet Explorer, Safari and Mobile Safari). | |
| − | |||
| − | |||
| − | |||
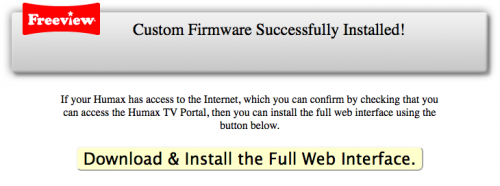
The Following message should be displayed in your web browser, confirming successful installation of the custom firmware: | The Following message should be displayed in your web browser, confirming successful installation of the custom firmware: | ||
| Line 15: | Line 15: | ||
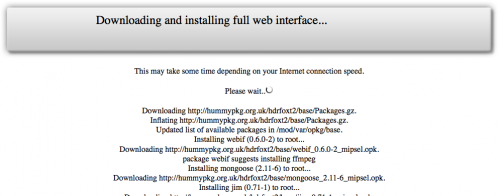
To bootstrap the web interface, click on the yellow button. It may take up to a minute for anything to appear in the browser depending on the speed of your Internet connection and the browser used. Once output starts, you should see a list of packages being downloaded and installed: | To bootstrap the web interface, click on the yellow button. It may take up to a minute for anything to appear in the browser depending on the speed of your Internet connection and the browser used. Once output starts, you should see a list of packages being downloaded and installed: | ||
| − | [[File: | + | [[File:Downloading_Web_Interface.png|500px|border]] |
| + | |||
| + | |||
| + | |||
| + | When the Full Web Interface installation is completed, re-entering your Humax's IP address again will display the Web-If Main screen as shown [[Web_Interface_Screenshots|'''HERE''']] | ||
| + | |||
| + | |||
| + | ===Error Messages=== | ||
| + | |||
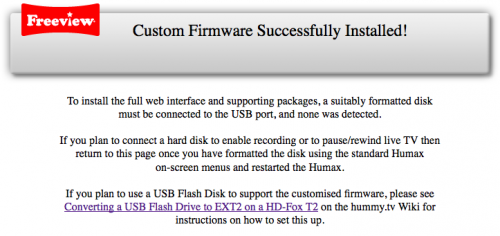
| + | If a suitably formatted USB disk is not detected on the HD-Fox T2 during installation of the Full Web Interface, then an error screen will be displayed e.g. :- | ||
| + | |||
| + | [[File:HD-No-EXT.png|500px]] | ||
| + | |||
| + | A similar message may be displayed if the internal hard drive on a HDR-Fox T2 can't be used for any reason | ||
| + | |||
| + | ==Command Line Installation== | ||
| − | + | If Installation using the 'Yellow Button' method above fails to complete for any reason it is worth trying it again, if this fails, you can initiate a forced re-install of the full Web Interface from a Telnet command line with :- | |
| − | + | <pre> | |
| + | opkg install webif --force-reinstall | ||
| + | </pre> | ||
Latest revision as of 20:35, 24 May 2016
Once the custom firmware has been successfully installed via USB, a simple web interface will be available by entering your Humax's IP address into a web browser. First, verify that your Humax has Internet access by using the Humax TV Portal to access some content. Then, using a web browser on a computer connected to the same network as the Humax, enter the IP address which has been assigned to the Humax into the address bar e.g. :-
10.0.0.200
To determine the IP address of your Humax, use the TV On-screen menus to navigate to MENU >> SETTINGS >> SYSTEM >> INTERNET SETTINGS >> CONFIGURE LAN >> IP Address
Then enter that IP address directly into the address of your favourite web browser (this process has been reported to work with Firefox, Internet Explorer, Safari and Mobile Safari).
The Following message should be displayed in your web browser, confirming successful installation of the custom firmware:
To bootstrap the web interface, click on the yellow button. It may take up to a minute for anything to appear in the browser depending on the speed of your Internet connection and the browser used. Once output starts, you should see a list of packages being downloaded and installed:
When the Full Web Interface installation is completed, re-entering your Humax's IP address again will display the Web-If Main screen as shown HERE
Error Messages
If a suitably formatted USB disk is not detected on the HD-Fox T2 during installation of the Full Web Interface, then an error screen will be displayed e.g. :-
A similar message may be displayed if the internal hard drive on a HDR-Fox T2 can't be used for any reason
Command Line Installation
If Installation using the 'Yellow Button' method above fails to complete for any reason it is worth trying it again, if this fails, you can initiate a forced re-install of the full Web Interface from a Telnet command line with :-
opkg install webif --force-reinstall


