Difference between revisions of "Password Protect the Web Interface"
Ezra pound (talk | contribs) |
|||
| (6 intermediate revisions by 2 users not shown) | |||
| Line 1: | Line 1: | ||
| + | === Through the <tt> Web-If >> Settings >> Web Interface Settings </tt> screen === | ||
| − | + | It is possible to add password protection to the web interface from the <tt>Settings Screen</tt>. After adding the first user, or removing the last, a restart is required for the changes to take effect. | |
| − | + | [[File:Webif_ACL.png]] | |
| − | + | === Old method - no longer required === | |
| + | {{Note|With older version of the web interface, the below procedure was necessary. It is retained for reference only}} | ||
| − | Note :- This | + | |
| + | Note :- This procedure requires <span style="background:#FFFF00"> Telnet </span>(Part of the Customised Software Package) | ||
'''1. Change to the web directory on your Humax box''' | '''1. Change to the web directory on your Humax box''' | ||
| − | <span style="background:# | + | <span style="background:#FFFF00"> cd /mod/var/mongoose/html/ </span> |
'''2. check no .htpasswd file already exists. ( just in case )''' | '''2. check no .htpasswd file already exists. ( just in case )''' | ||
| − | <span style="background:# | + | <span style="background:#FFFF00"> ls -alsh </span> |
If you already have a .htpasswd file you should see it listed. | If you already have a .htpasswd file you should see it listed. | ||
| − | <span style="background:# | + | <span style="background:#FFFF00"> cat .htpasswd </span> |
| Line 30: | Line 33: | ||
By default the Humax's authentication domain is mydomain.com. So to add a user called 'admin' with the password 'pass' run the following command. | By default the Humax's authentication domain is mydomain.com. So to add a user called 'admin' with the password 'pass' run the following command. | ||
| − | <span style="background:# | + | <span style="background:#FFFF00"> /mnt/hd2/mod/sbin/mongoose -A ./.htpasswd mydomain.com admin pass </span> |
| Line 39: | Line 42: | ||
If this doesn't work or you need to remove the authentication request, this can be done using : | If this doesn't work or you need to remove the authentication request, this can be done using : | ||
| − | <span style="background:# | + | <span style="background:#FFFF00"> rm .htpasswd </span> |
I haven't tried this, BUT !! It appears you can change the authentication domain from mydomain.com by editing the mongoose.conf located in | I haven't tried this, BUT !! It appears you can change the authentication domain from mydomain.com by editing the mongoose.conf located in | ||
| − | <span style="background:# | + | <span style="background:#FFFF00"> /mnt/hd2/mod/etc </span> |
Adding the following should change the domain to localhost: | Adding the following should change the domain to localhost: | ||
| − | <span style="background:# | + | <span style="background:#FFFF00"> authentication_domain localhost </span> |
If you do this you would need to change mydomain.com to localhost when you create your username and password. eg: | If you do this you would need to change mydomain.com to localhost when you create your username and password. eg: | ||
| − | <span style="background:# | + | <span style="background:#FFFF00"> /mnt/hd2/mod/sbin/mongoose -A ./.htpasswd localhost admin pass </span> |
BY [http://hummy.tv/forum/threads/working-password-protecting-the-web-interface.405/ TomT] | BY [http://hummy.tv/forum/threads/working-password-protecting-the-web-interface.405/ TomT] | ||
Latest revision as of 12:58, 2 July 2014
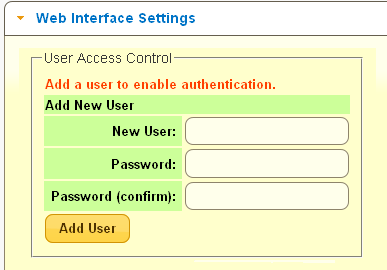
Through the Web-If >> Settings >> Web Interface Settings screen
It is possible to add password protection to the web interface from the Settings Screen. After adding the first user, or removing the last, a restart is required for the changes to take effect.
Old method - no longer required
![]() Note:
With older version of the web interface, the below procedure was necessary. It is retained for reference only
Note:
With older version of the web interface, the below procedure was necessary. It is retained for reference only
Note :- This procedure requires Telnet (Part of the Customised Software Package)
1. Change to the web directory on your Humax box
cd /mod/var/mongoose/html/
2. check no .htpasswd file already exists. ( just in case )
ls -alsh
If you already have a .htpasswd file you should see it listed.
cat .htpasswd
Will show you the contents of this file.
3. create the .htpasswd file
By default the Humax's authentication domain is mydomain.com. So to add a user called 'admin' with the password 'pass' run the following command.
/mnt/hd2/mod/sbin/mongoose -A ./.htpasswd mydomain.com admin pass
You can check the .htpasswd file has been created and view it's contents using the ls and cat commands above.
Now when you access you Humax via your browser you should be asked to enter the username and password for mydomain.com You can add multiple usernames and password to the .htpasswd file by repeating the above command changing admin & pass as needed. If this doesn't work or you need to remove the authentication request, this can be done using :
rm .htpasswd
I haven't tried this, BUT !! It appears you can change the authentication domain from mydomain.com by editing the mongoose.conf located in
/mnt/hd2/mod/etc
Adding the following should change the domain to localhost:
authentication_domain localhost
If you do this you would need to change mydomain.com to localhost when you create your username and password. eg:
/mnt/hd2/mod/sbin/mongoose -A ./.htpasswd localhost admin pass
BY TomT
